

AOI selection#
In most SEPAL modules, the first mandatory input is the area of interest (AOI), which is used as a boundary to cut the processes and its outputs.
If you are using the default Process recipes or custom Applications, you will find different user interfaces.
Recipe AOI#
Recipes are accessible through the orange globe icon located on the left side of the SEPAL interface.
For many recipes, an AOI has to be selected.
Locate the AOI selection button in the lower-right corner.
Select the AOI button to open the selection window.
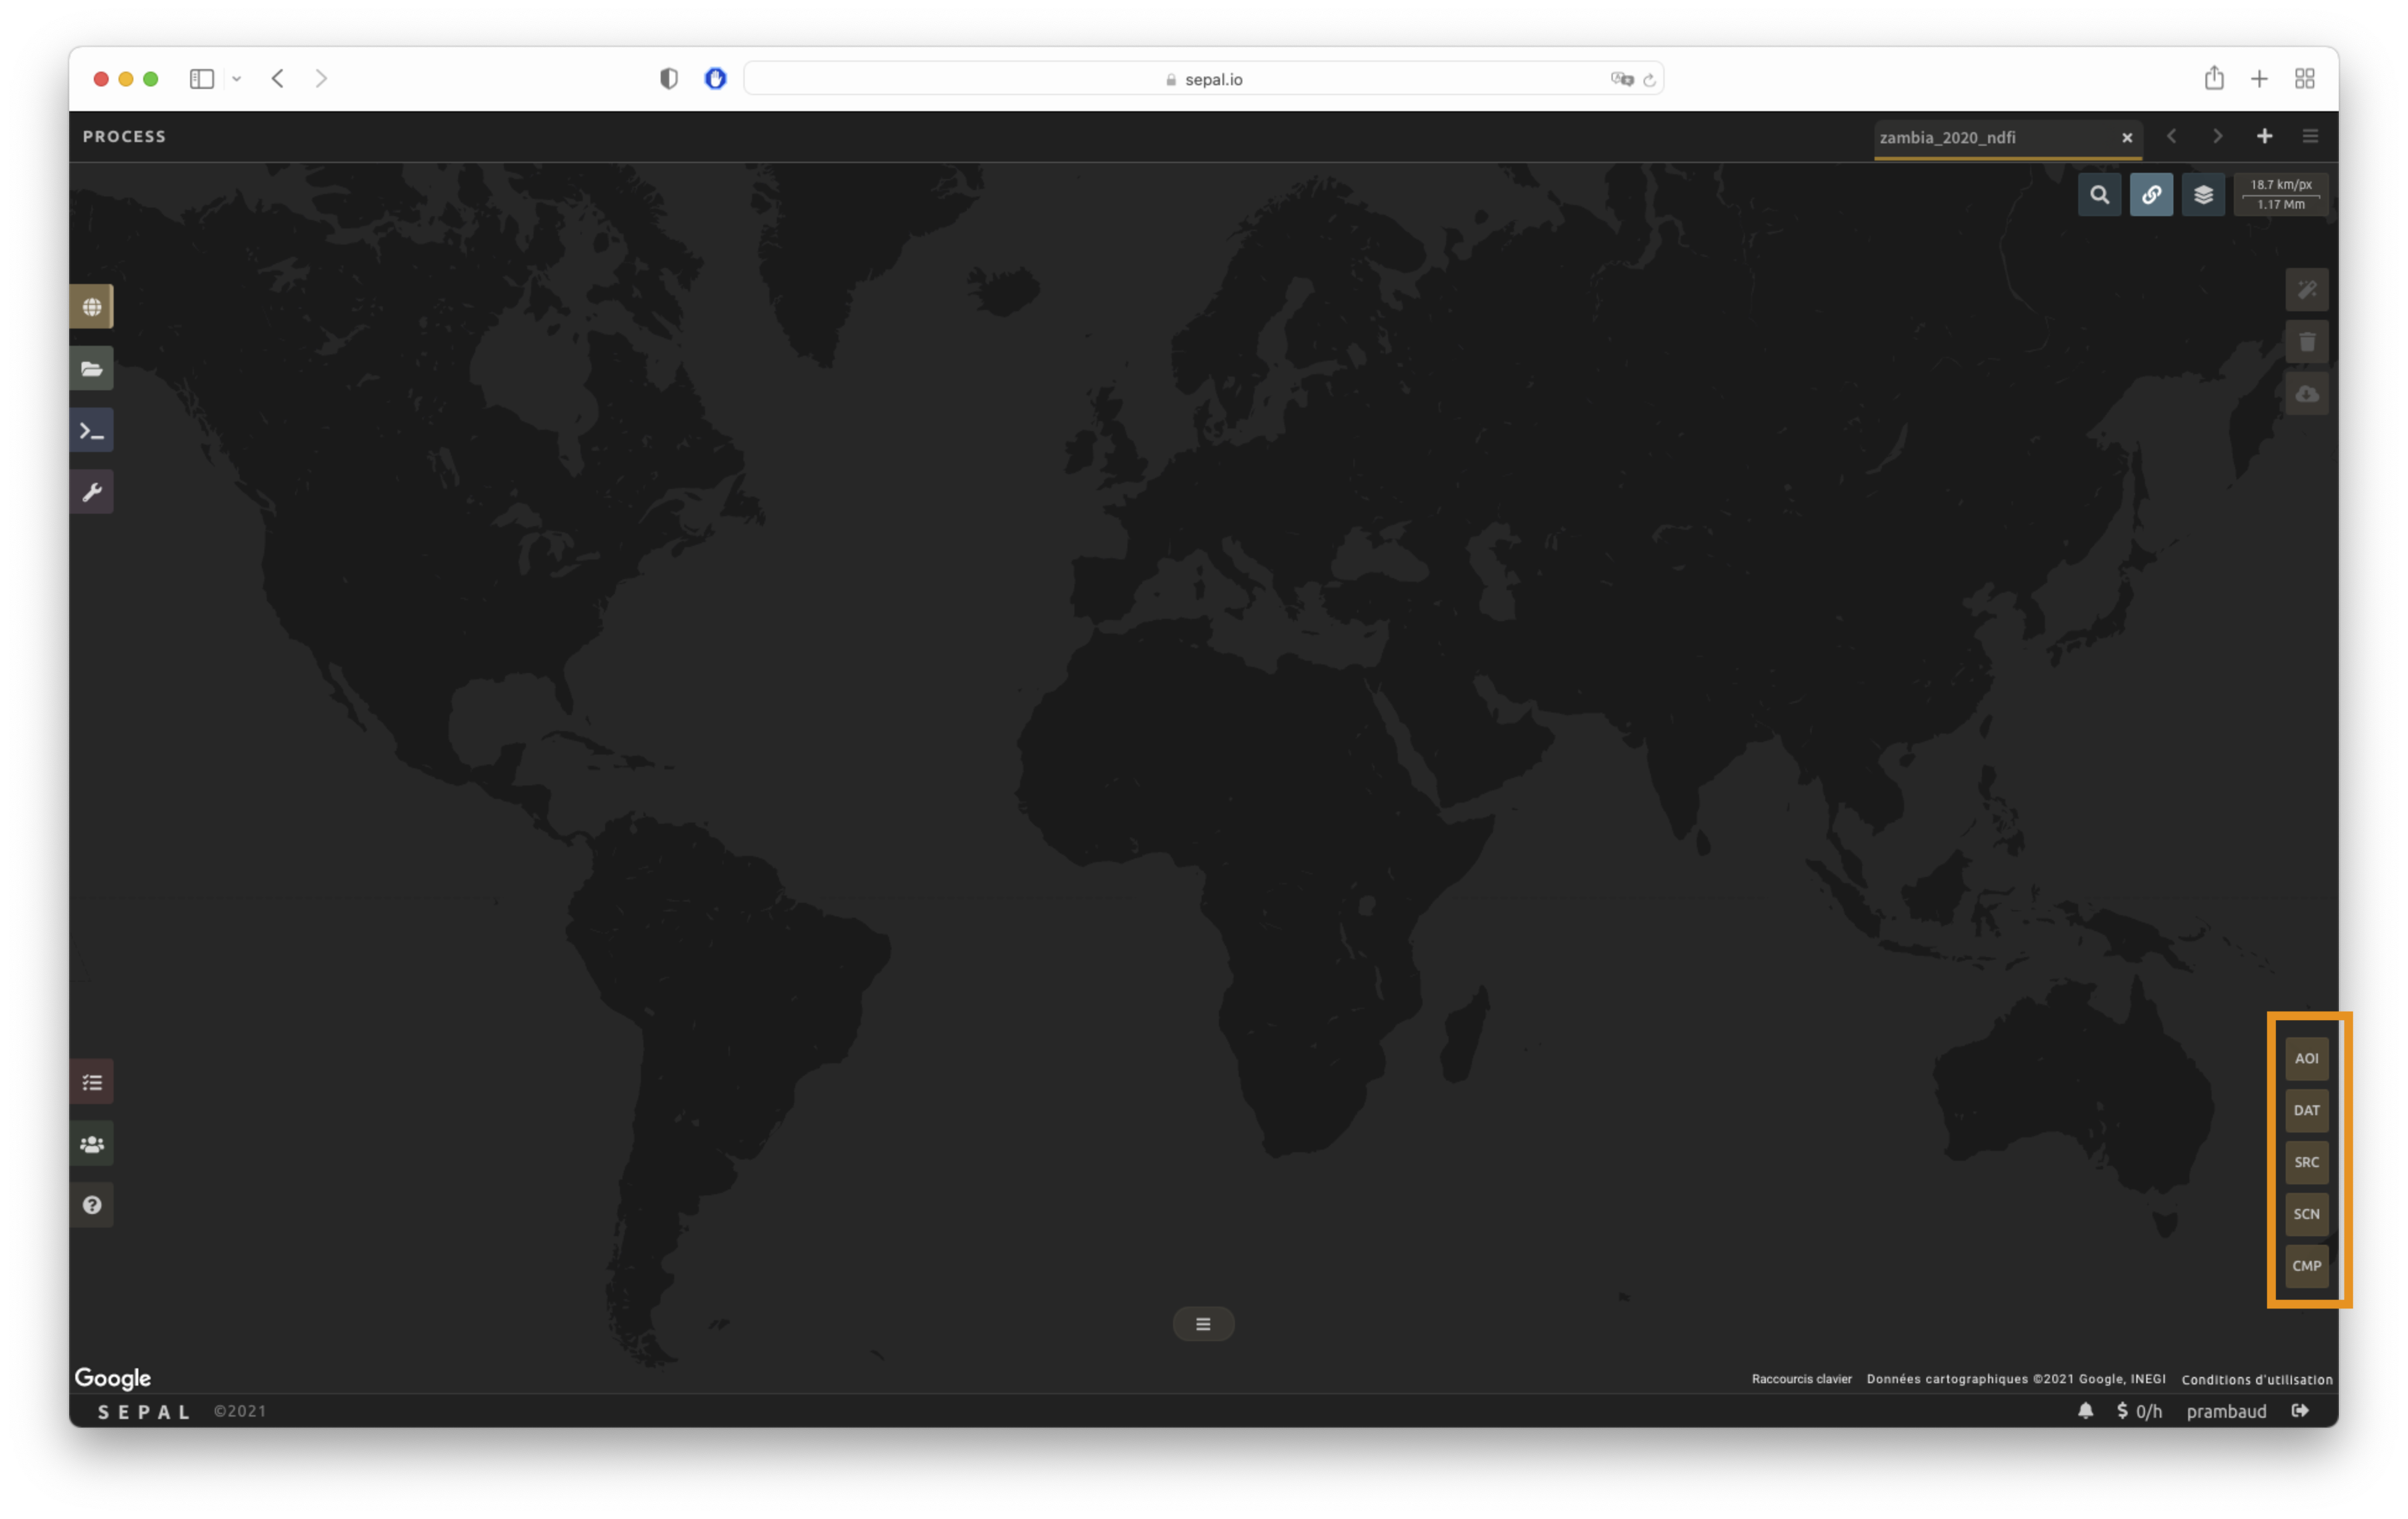
There are multiple methods for selecting AOIs in SEPAL process recipes:
Country/province (administrative boundaries)
EE Tables (GEE)
Drawn polygons

Tip
The selected method at this step is not definitive. You can change it at any stage by selecting the selected method dropdown list in the upper part of the AOI window. A list with the available methods will be displayed.
Administrative boundaries#
You can select administrative layers as AOIs.
These geometries are extracted from the FAO GAUL Level 0 dataset available on GEE.
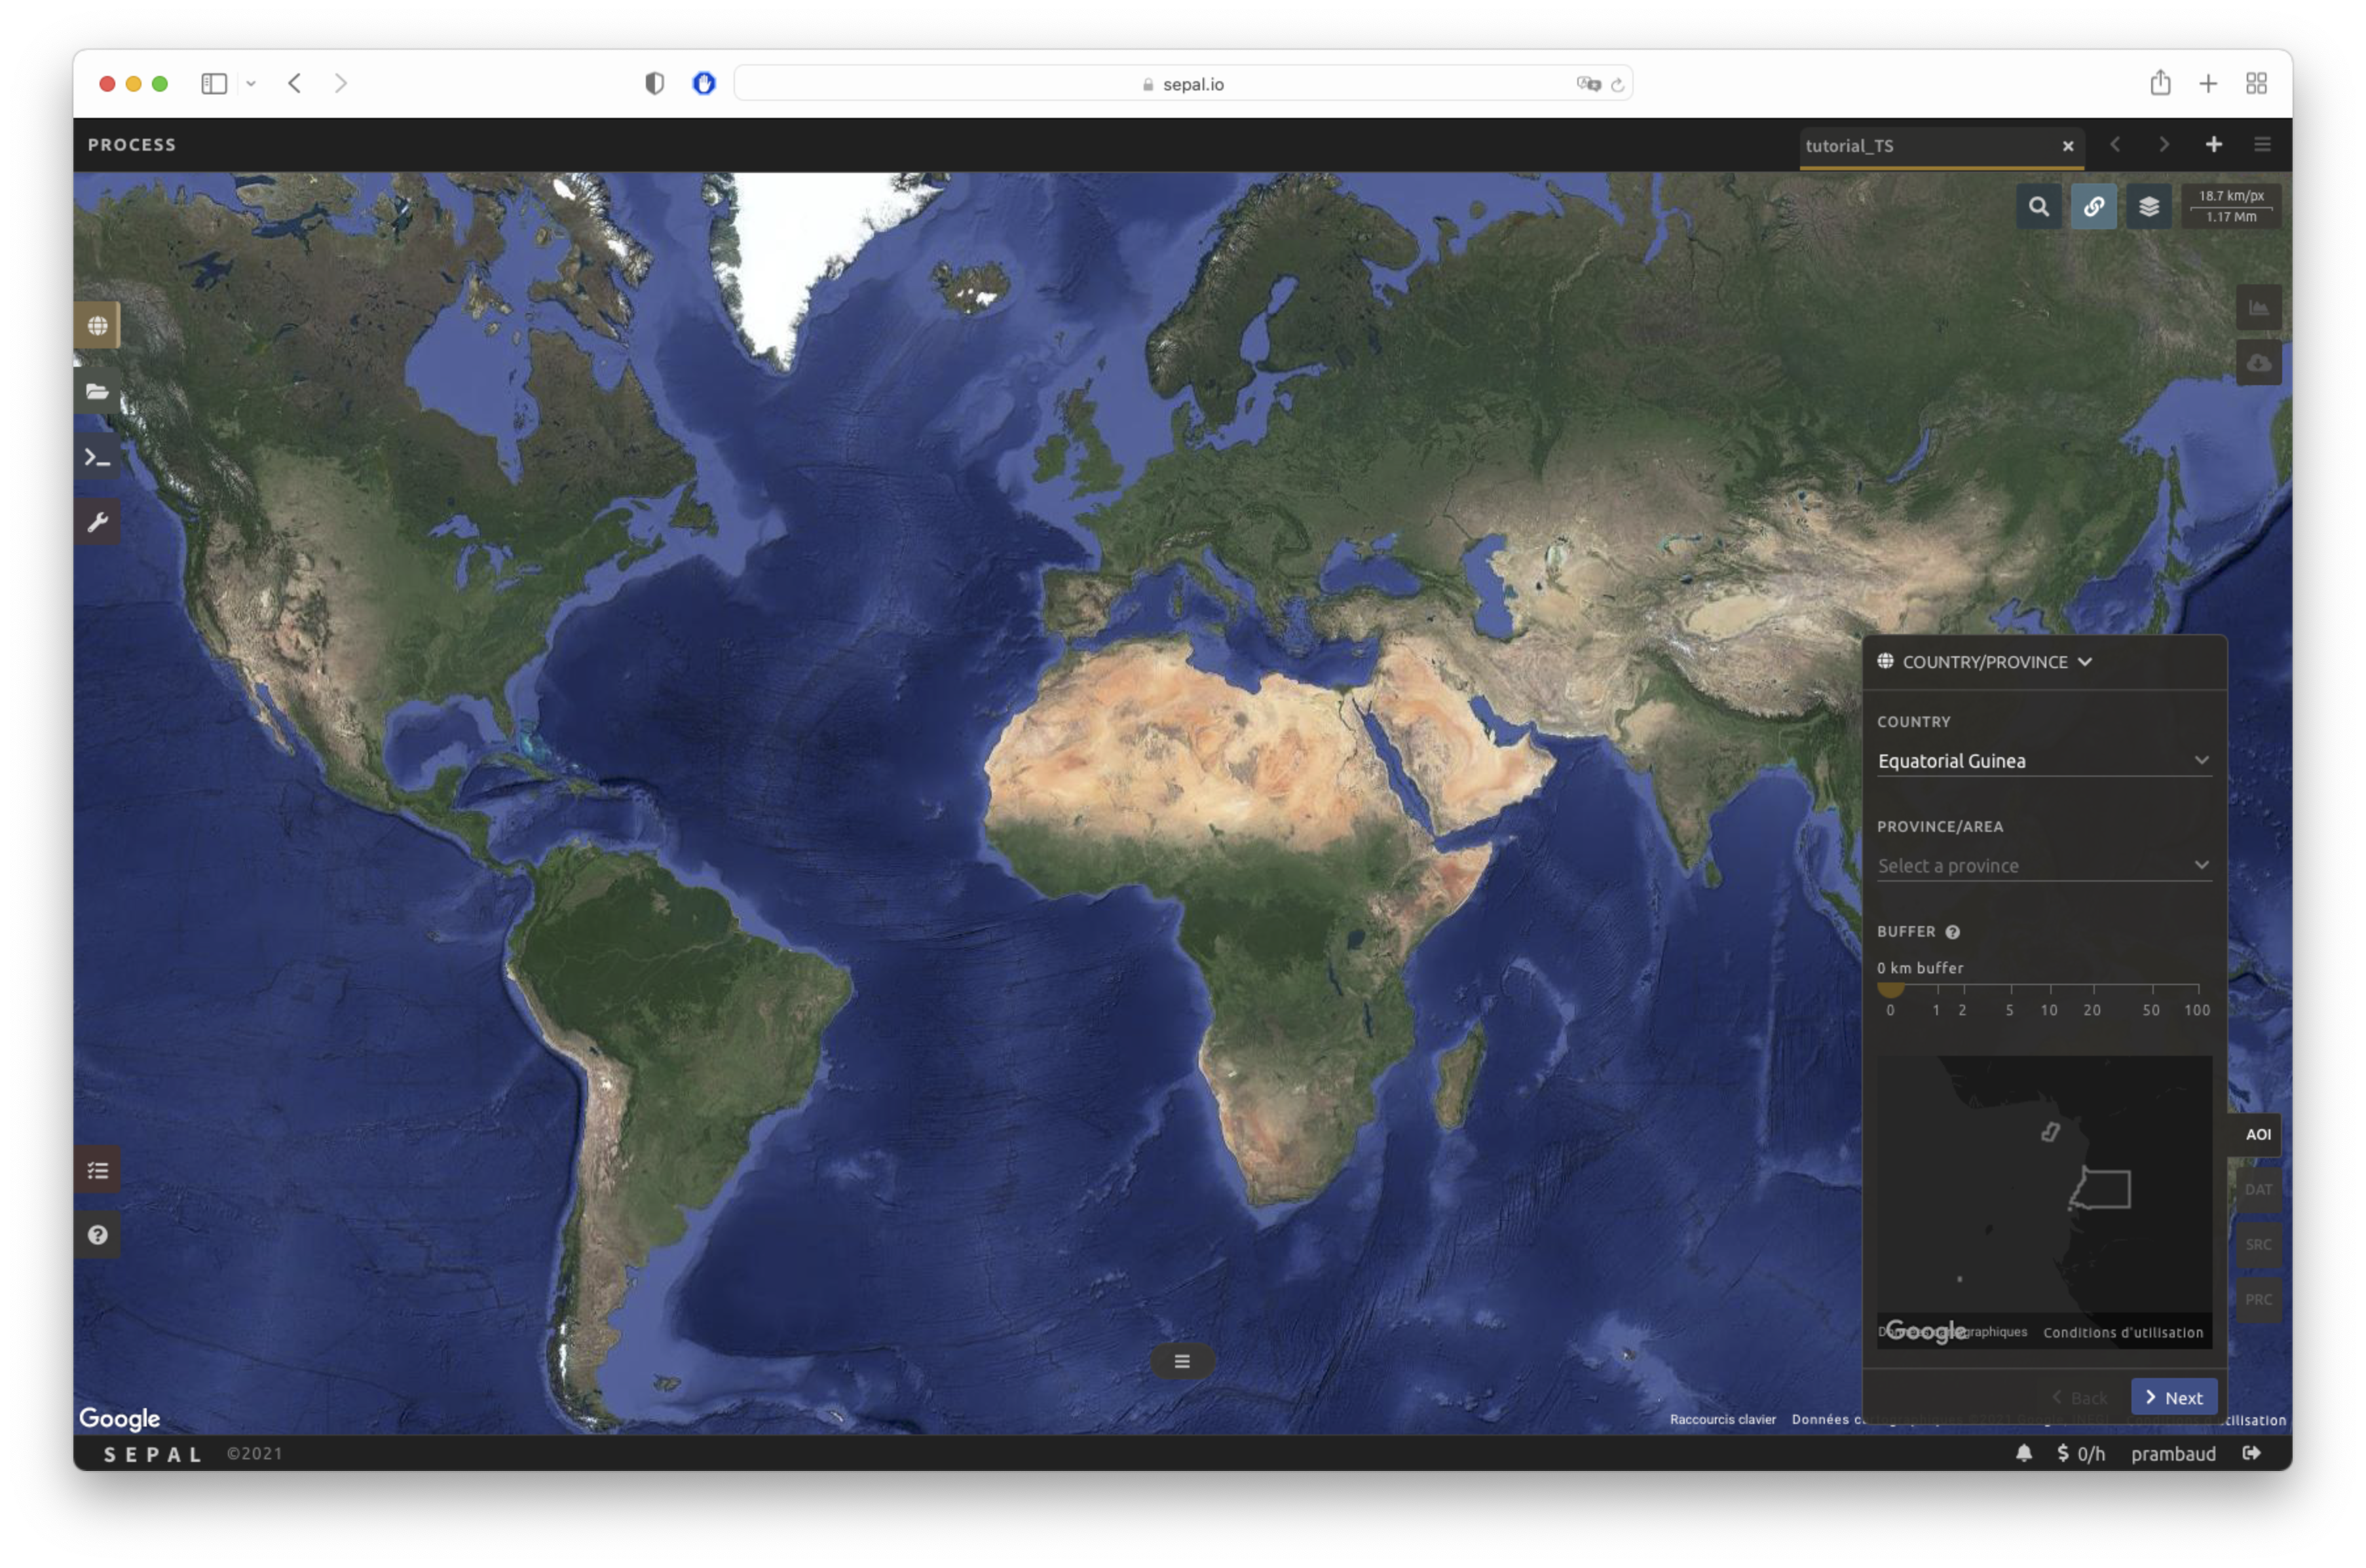
To use them, select the Select country/province method in the dropdown list.
Note
Since GEE does not support non-Latin characters, accents and special characters have been removed from country and province names.
In the first dropdown menu, you will be able to select a country (Administrative layer 0) from the country list. Optionally, you can select a province (Administrative level 1) within the country selected. The dropdown list is updated on the fly with the first administrative level boundaries being based on the country selection. If nothing is selected, the whole country will be considered.
A buffer can be applied to AOI boundaries by defining its size (km) using the provided slider. By default, it is set to 0 and is therefore disabled.
Note
The AOI and preview will take longer to display when buffering is enabled.
Once all parameters are selected, the AOI will be previewed in the small map at the bottom of the frame.
To validate it, select the Apply button.
Once validated, the map will zoom in on the AOI and draw it in grey on the map.
EE table#
You can use custom AOI defined by shapes.
These shapes need to be ingested in GEE as a ee.FeatureCollection (see How to upload custom assets to GEE).
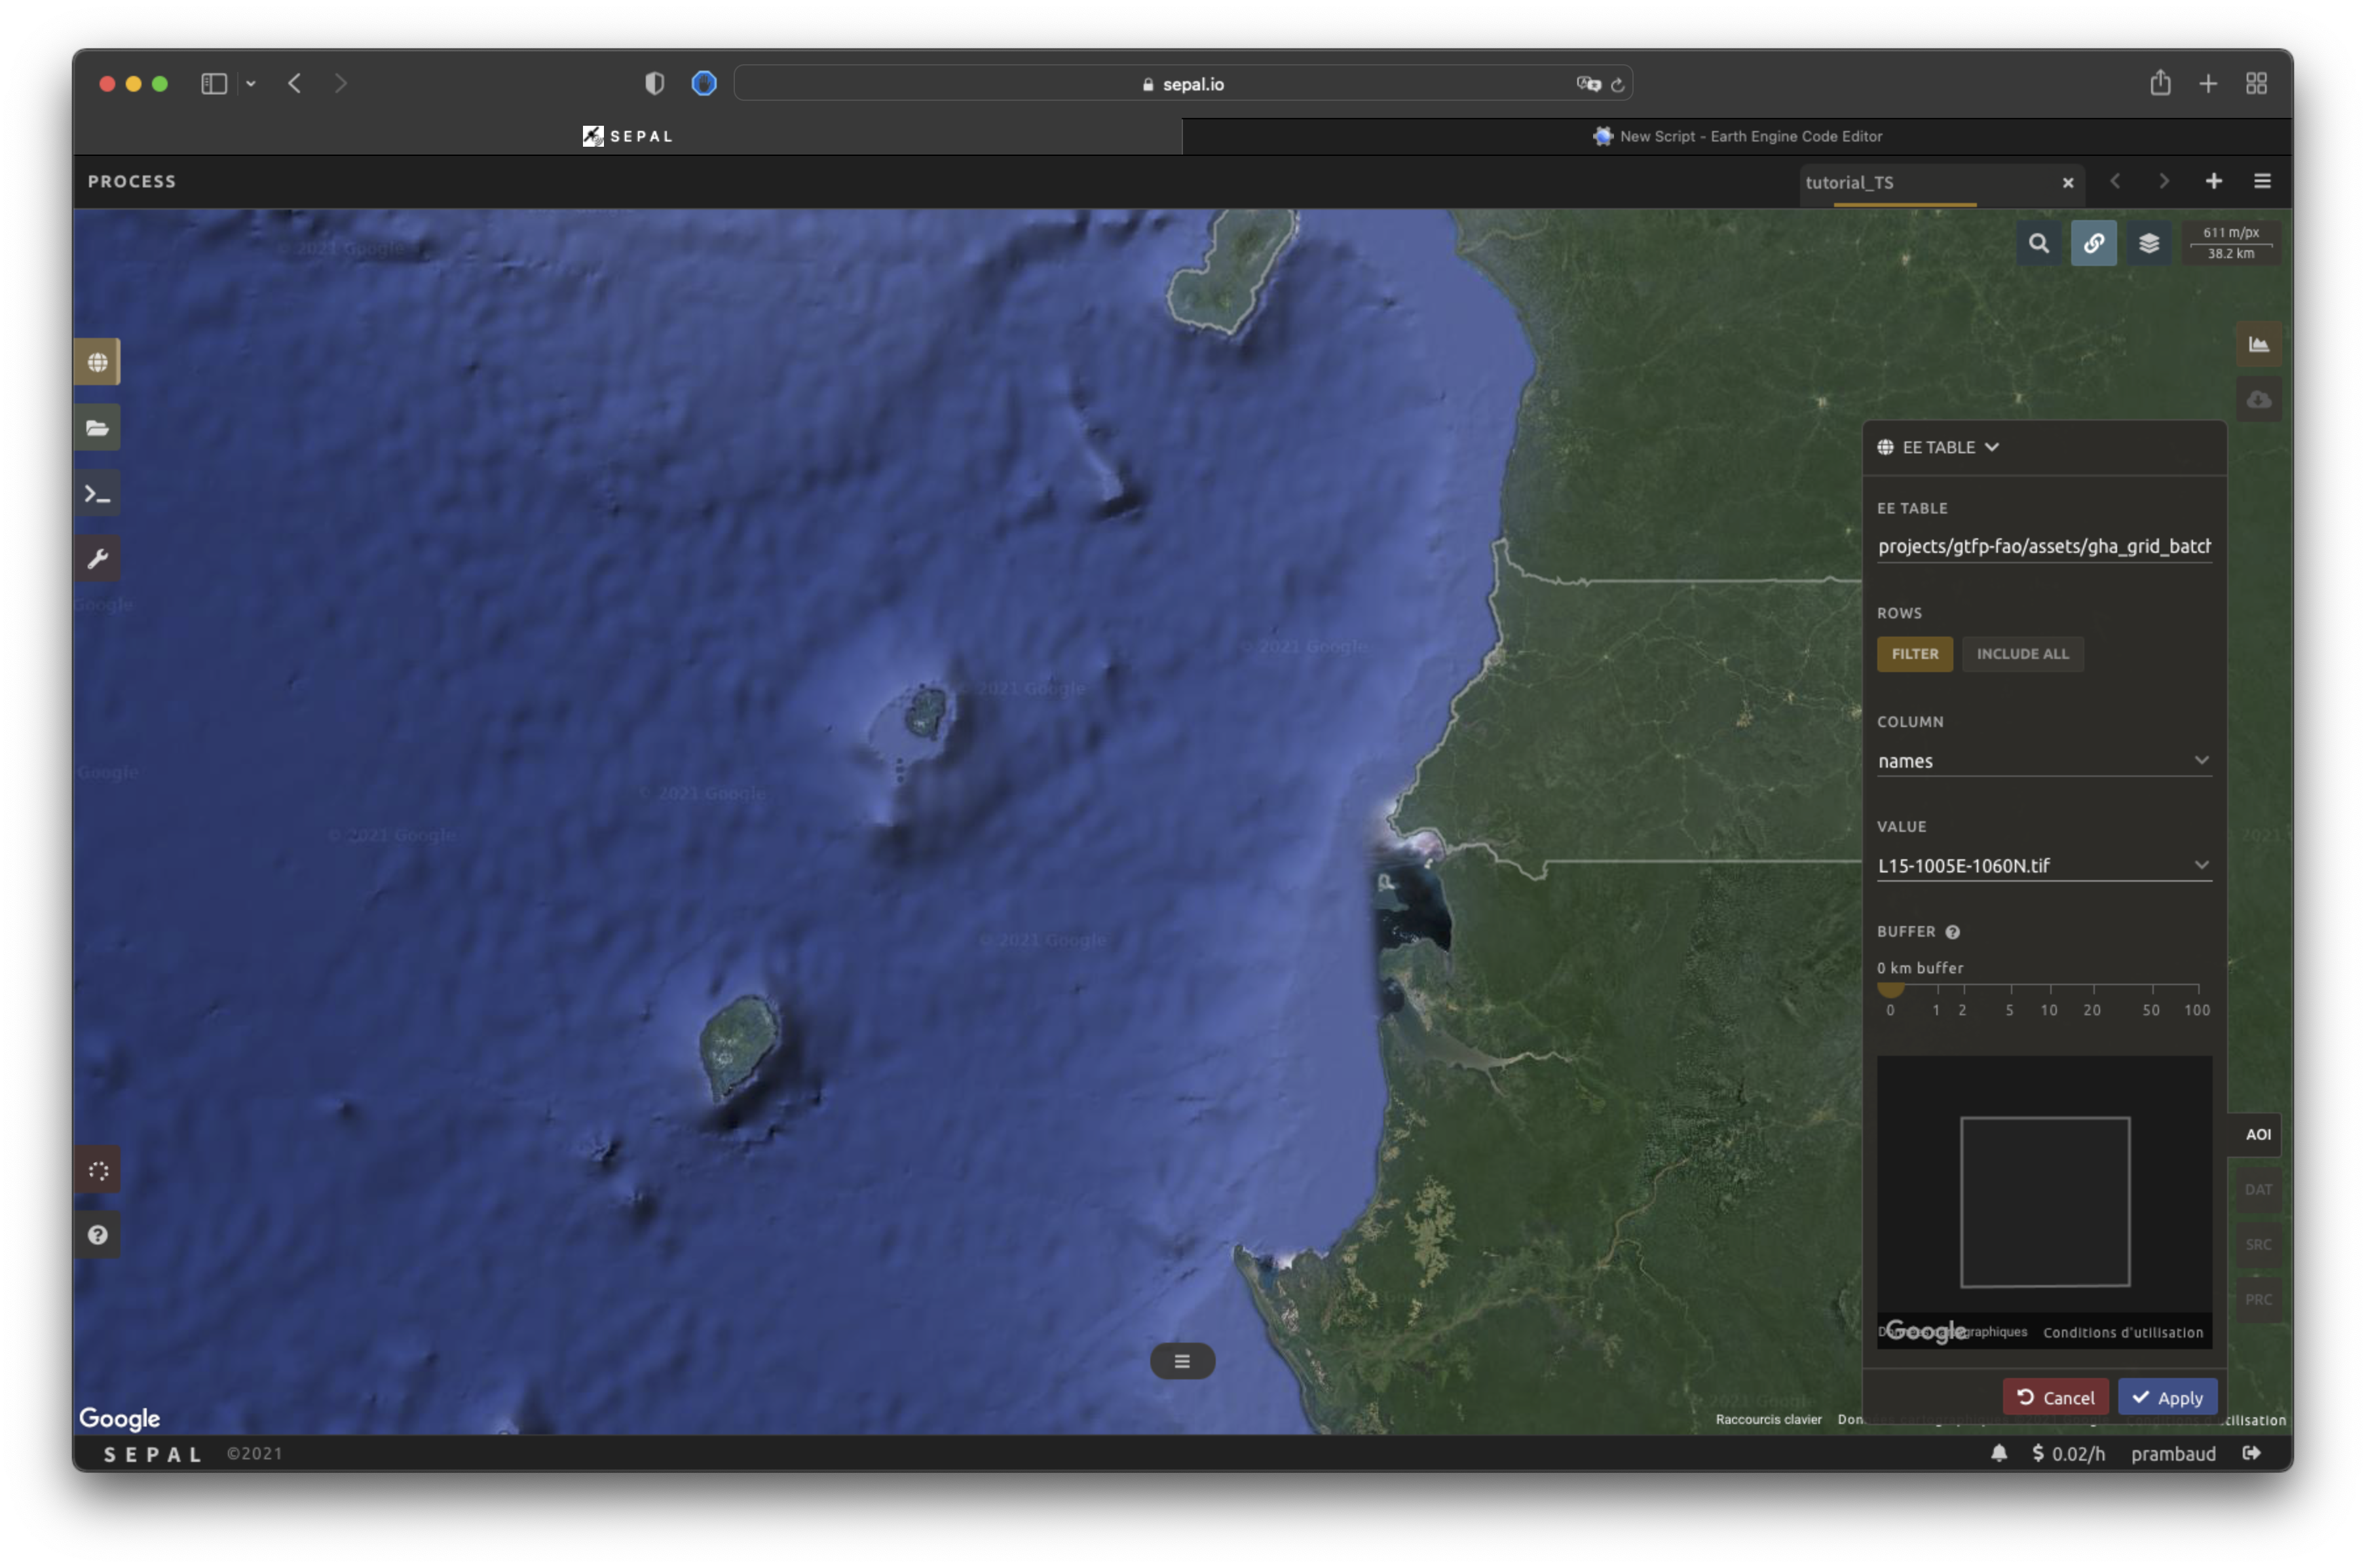
To use this method, select EE table.
In the first dropdown list, provide a completely qualified GEE asset name (e.g. projects/gtfp-fao/assets/aoi_ecowas).
Attention
Make sure you have access to this asset. If you do not have access, ask the owner of the source to modify sharing permissions; otherwise, you won’t be able to use the dataset.
Select Include all and all geometries associated with the features will be used as an AOI.
Select Filter and you will be able to provide a column name and a value to filter the table; the AOI will then be reduced to the filtered features in the input asset.
A buffer can be applied to these boundaries by defining its size (km) using the provided slider. By default, it is set to 0 and is therefore disabled.
Note
The AOI and the preview will take longer to display when buffering is enabled.
Once all of the parameters are selected, the AOI will be previewed in the small map at the bottom of the frame.
To validate it, select the Apply button.
Once validated, the map will zoom in on the AOI and draw it in grey on the map.
Draw polygon#
You can use a custom AOI defined by a drawn shape, which will be converted into a ee.FeatureCollection on the fly.
Select Draw a polygon to use this method.
The pointer on the map will be converted into a .
Click successively on the map to draw a polygon.
Once the geometric shape is closed, the AOI will be previewed in the small map at the bottom of the frame.
To validate it, select the Apply button. Once validated, the map will zoom in on the AOI and draw it in grey on the map.

Module AOI#
The Module AOI selector is available in some contributor modules.
To access an app, select the purple wrench , located on the left side of the SEPAL platform.
Then, use the app’s dashboard to search and open a module.
A Module AOI selector is composed of two main sections:
the available methods; and
the map.
Although we will mention all features and methods available, some might not be available in the context of the module you are working on.

Available methods#
There are two types of processes that require different AOI inputs, depending on the way the module is created and where the core processes are done:
directly in a SEPAL instance; or
in GEE.
Although both interfaces appear to be the same, the methods and internal data sources may vary, such as administrative definitions.
Administrative definitions#
Similar to the previously mentioned Recipe AOI selector, the module AOI uses FAO GAUL GEE boundaries for GEE and GADM 3.6 features for local processes.
However, in this case, the tool allows you to recurse at a maximum second administrative level. The available sources are the following:
GEE#
Country/province (level 0): Countries or provinces at level 0, available at FAO GAUL GEE level 0;
Admin level 1: First administrative level, FAO GAUL GEE level 1; and
Admin level 2: Second administrative level, FAO GAUL GEE level 2.
Local#
All administrative levels are accessible from the GADM website.
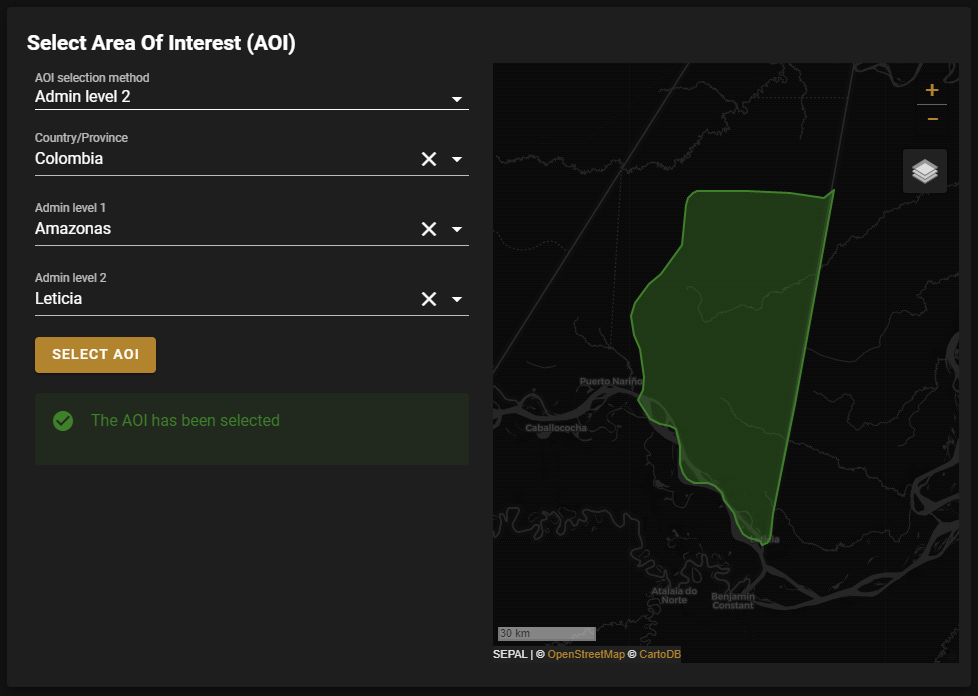
Use the AOI selection method dropdown list to select the target administrative level.
A new dropdown list will load with all corresponding boundaries to the next administrative level that is linked with the base level.
For example, select Admin level 2 as the method, choose Colombia as the country, select the Amazonas department as the next level, and finally select the Leticia municipality.
Custom geometries#
When you are looking for a more specific AOI, the Module AOI selector has the following options:
Vector file
Drawn shape
Point file
GEE asset
Vector file#
Use this option to upload a custom vector file.
Select the Vector file method in the dropdown list.
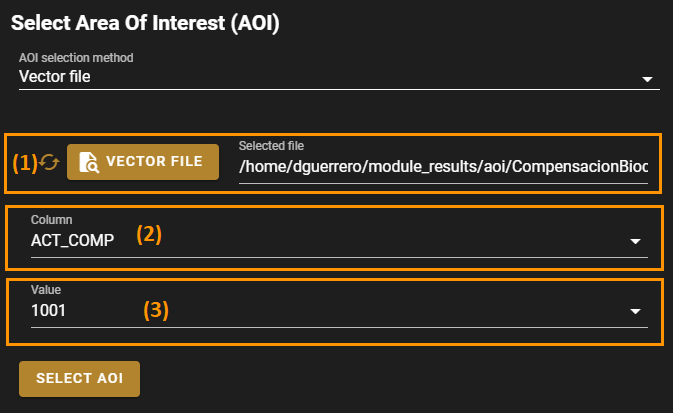
A file manager widget (see 1 in the following figure) will be displayed below, allowing you to search and select a vector file stored in your SEPAL environment (see How to exchange files with SEPAL).
The dropdown list, Column (2), is useful to filter features of the vector file. The default option is Use all features, meaning any filter is used.
To filter the collection, select a column and a Value (3) in the corresponding dropdown list, then select the Select AOI button.
Note
Available vector formats include: [.shp, .geojson, .gpkg, .kml]. Once selected, the module will transform its original coordinate system into EPSG:4326.
Remember that if the module you are using is doing the computation in GEE, a new feature collection asset will be created and stored in you GEE root folder using the name of the provided file prefixed by aoi_.
Drawn shape#
Use this option to manually draw geometric shapes on the map.
Select the Drawn shapes method in the dropdown list.
Then, create a name for your drawing, if desired. If not provided, the tool will assign a unique name containing the following structure:
Manual_aoi_YYYY-MM-DD_HH-MM-SS
Note
If the module you are using is completing the process in GEE, a new asset will be created and stored in the root of your GEE account with the given name prefixed by aoi_.
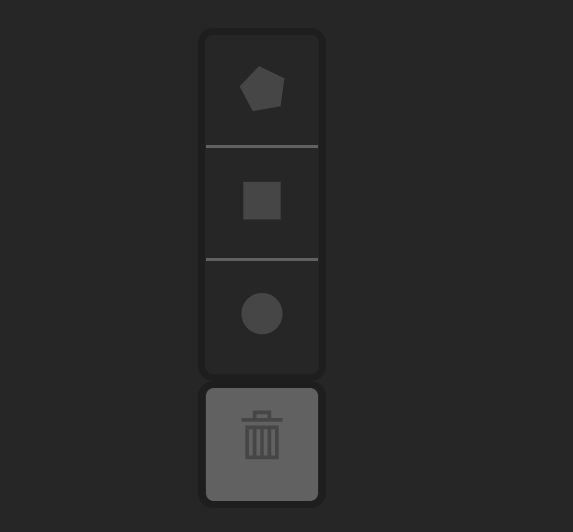
Three geometric shapes will appear in the upper-left corner of the map: a polygon, a square, and a circle.
Tip
To draw, zoom in on your AOI by using the mouse wheel button, or the and buttons located in the upper-right corner.
(polygon): Draw your custom polygon by clicking the vertices of the geometry on the map. To close and finish your geometry, click the first vertex or select the finish button. Note that once you select the polygon geometric shape, three new buttons will be available at the top of the map: Finish, Delete last point and Cancel.
(rectangle): Click the upper-left corner of the rectangle in the map (it will be the first vertex of the geometric shape). Then — without clicking — move the mouse to the opposite corner (lower left) and click the map (this will close the geometric shape; the rectangle will be teal in color).
(circle): Click and hold the center of the circle, and then — while still holding — draw the distance (radius). A new blue marker will appear on the map, showing the center of the circle. (The geometrical shape won’t be drawn on the map until you select the Select AOI button, so do not worry if you can’t see the circle at this time; the module will save the geometry in the background.)
Point file#
Use this method to load a single point or multipoint datasets. Select Point file in the Method dropdown list. Four new widgets will appear, including a File selector (1), and three dropdown lists: ID (2), Longitude (3), and Latitude (4).

Use the file selector widget to navigate through your SEPAL environment and search for a table file (.csv or .txt) containing the coordinates of your points.
Make sure the file uses the following structure:
at least three columns;
one providing an ID (unique point identifier);
one providing longitude coordinates; and
one providing latitude coordinates.
Attention
The point coordinates need to be set in EPSG:4326.
Here is an example of a compatible point file:
ID |
x |
y |
|---|---|---|
1 |
-74.0 |
4.0 |
2 |
-75.0 |
5.0 |
Once the table is loaded, the system will try to automatically identify the Id, Longitude and Latitude columns. When this is not possible, the fields will remain empty and you will have to manually match them.
Note
The columns don’t have to be named with any specific structure; the only requirement is that your dataset has to be composed of columns for ID, longitude and latitude.
GEE asset#
Use this method to load a custom feature collection available as an asset in GEE.
Select GEE asset name in the Method dropdown list.
The following widgets will appear by default:
an asset selector (1);
a dropdown list containing the columns of the selected asset (2); and
unique column fields, which are optional (3).
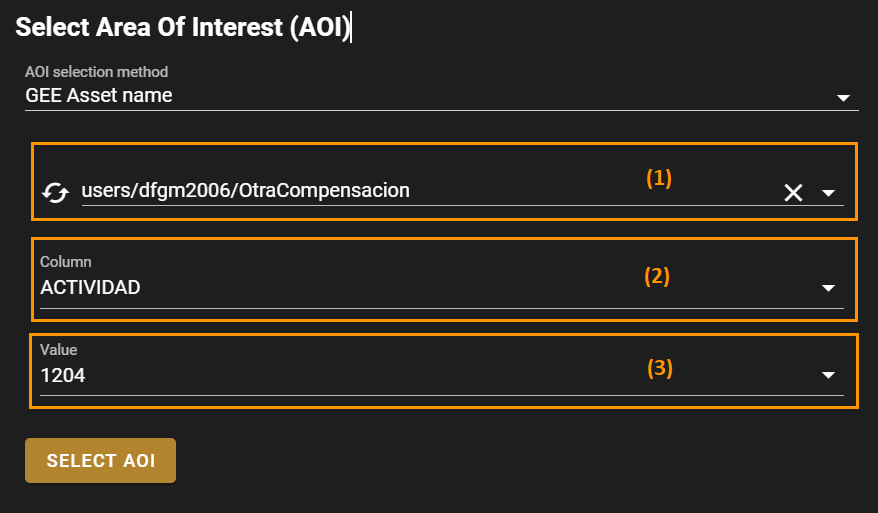
The file selector widget will search for all Table assets (i.e. Feature collection) stored in your GEE account. You can also copy and paste a custom third-party asset into the text field; however, be sure that you have access permission – otherwise, the module won’t be able to use that source and an error message will be displayed.
Once you have selected a valid asset, the module will query all available columns in your provided asset and display them in the Column dropdown widget. By default, all features in the dataset will be selected (Use all features); however, if you are interested in using a specific geometry, select a column to filter your dataset; a new dropdown list will load all of the unique values for that specific column – select one.
Note
This method will only be available when you are using a module that requires a connection to your GEE account. You can check this by navigating through the app’s dashboard and noticing the icon at the right side of the shapes.
Note
All of the modules do not have all of the mentioned methods. Their availability will depend on the module context (e.g. some apps require polygons, while others require points).
Finally, select the Select AOI button. If all inputs are correct, you will see a success message and your AOI will be displayed in green on the map. Otherwise, an indicative error message will be displayed.