

Attention
The SEPAL team documentation section was developed for SEPAL team members only. While contributors and collaborators are encouraged to review these articles, they are not mandatory for general SEPAL users.
Contribute#
Learn how to make contributions to SEPAL documentation
The SEPAL team values user feedback and contributions to SEPAL documentation.
Before contributing, please review the SEPAL Code of conduct.
Then, communicate feedback or proposed contributions via:
Introduction#
The sepal-doc repository has a fixed structure that needs to be respected to follow Sphinx builder requirements.
All modifications should be made in the folder, sepal-doc/docs/source/.
Images associated with a page should be stored in the corresponding folder, sepal-doc/docs/source/_images/.
If files are misplaced, their build into .html pages cannot be guaranteed.
Please carefully review the following instructions before contributing to SEPAL documentation.
Tools#
The sepal-doc repository creates and organizes .rst files by leveraging:
the Python Sphinx library to create the build; and
the ReadTheDoc website to distribute the build.
Important
To contribute to SEPAL documentation, you will need:
basic knowledge of any lightweight markup language (e.g. markdown, latex), which will help you understand .rst files;
a GitHub account; and
a basic understanding of terminal commands.
Guidelines#
There are only two guidelines to follow that are not directly specified in the .rst documentation or template:
Indentation: Insert
4 spacesfor bullet points and directives (options and content); andHeadings: Use the appropriate symbols for section heading formatting, as seen below.
Heading 1
=========

Heading 2
---------

Heading 3
^^^^^^^^^

Heading 4
"""""""""

Heading 5
#########

Heading 6
+++++++++
Custom#
The following custom directives were added to help build the documentation.
Videos#
There are two ReST directives for embedding videos from YouTube (youtube) and Vimeo (vimeo).
The video ID must be included.
While the default height is 281, the default width is 500, and the default alignment is left, both directives can be customized by specifying the following:
heightwidthalign
Here is an example:
.. youtube:: Ub6N8aWThw4
    :height: 315
    :width: 560
Line breaks#
The ReST directive for creating a line break does not require any argument.
Here is an example:
.. line-break::
Graphviz#
There is also a directive to embed Graphviz code. The input code for dot is given as the content.
To better understand Graphviz, see Graphviz documentation.
Here is an example:
.. graphviz::

    digraph foo {
    "bar" -> "baz";
    }
Icons#
There is a ReST role to include in-line icons.
Use icons from the Font Awesome library.
Folder icon: :icon:`fa-solid fa-folder`
Folder icon:
Minor change#
Page edit#
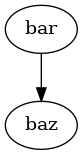
If you would like to make modifications to an existing article in the documentation because you’ve seen a typo or would like to improve an explanation, select the Edit on GitHub button in the pane on the right side of your browser window (if the button isn’t visible, use your browser’s Zoom out function or open the pane using the triple bar button [☰] in the upper-right corner).
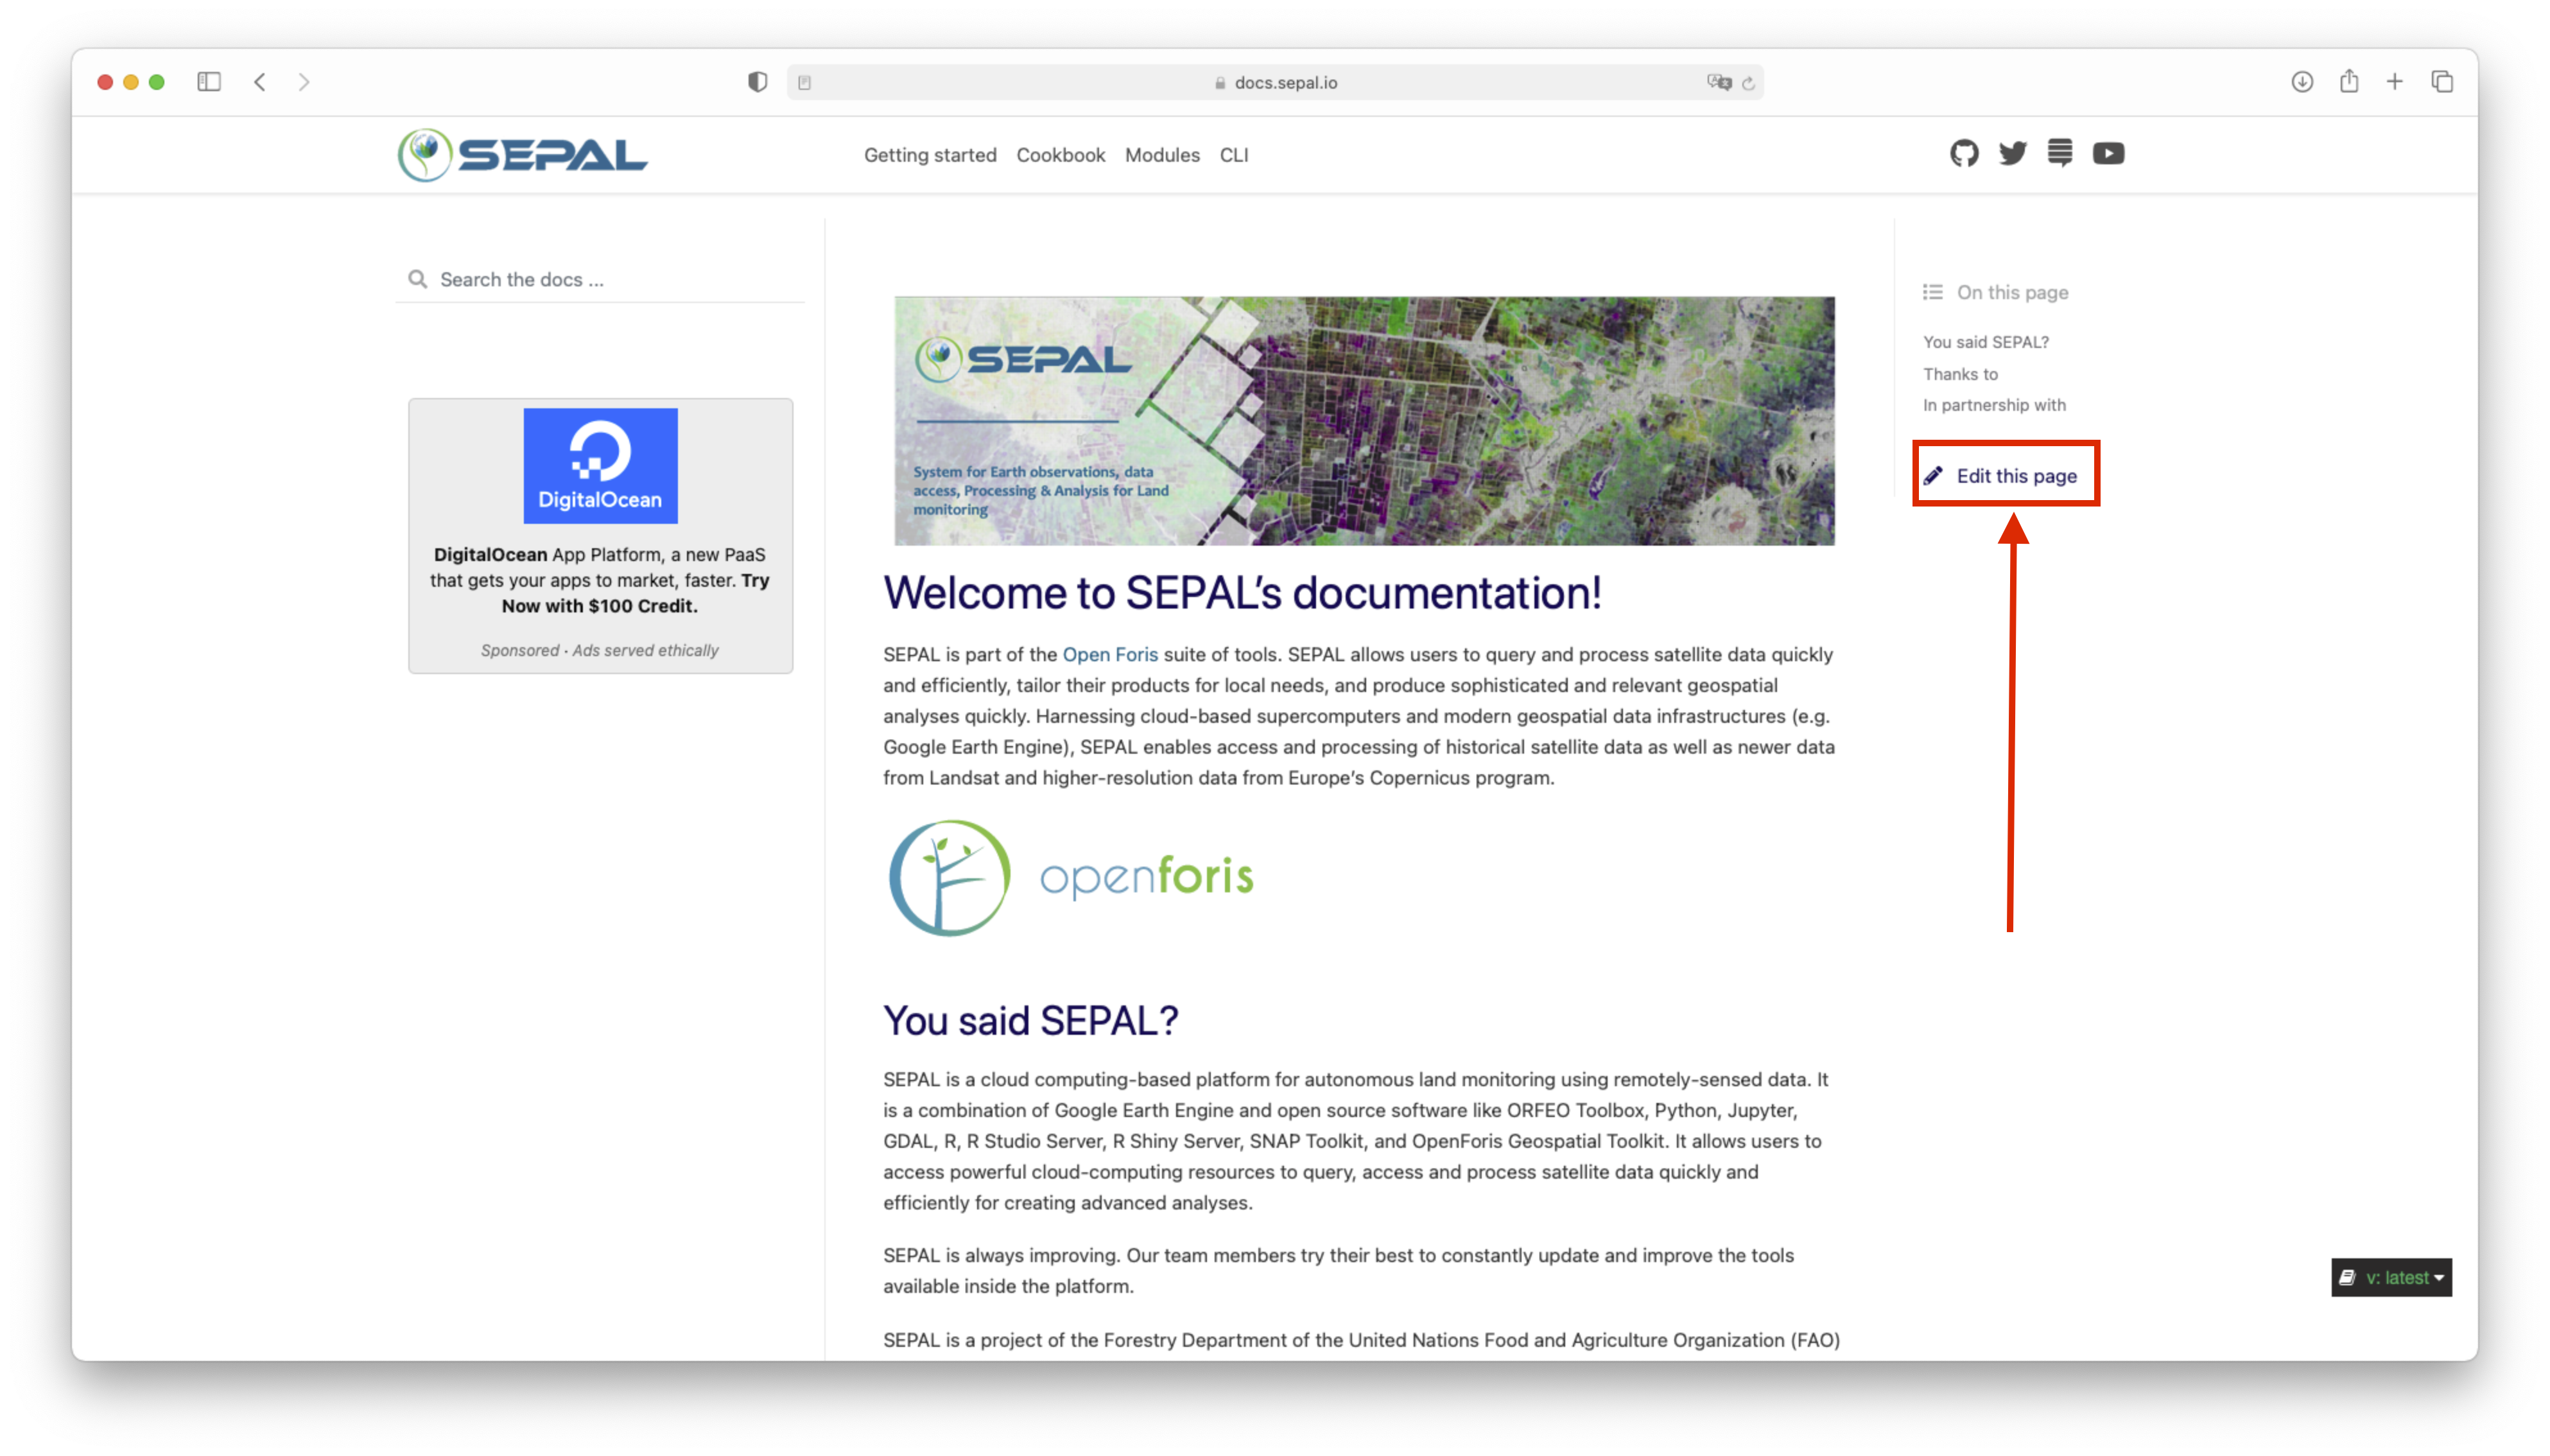
When you are finished modifying the file in the GitHub editor, select propose change at the bottom of the page.
This will create a Pull request (PR) that includes your modifications, which will be reviewed and evaluated by the SEPAL team before being published.
Tip
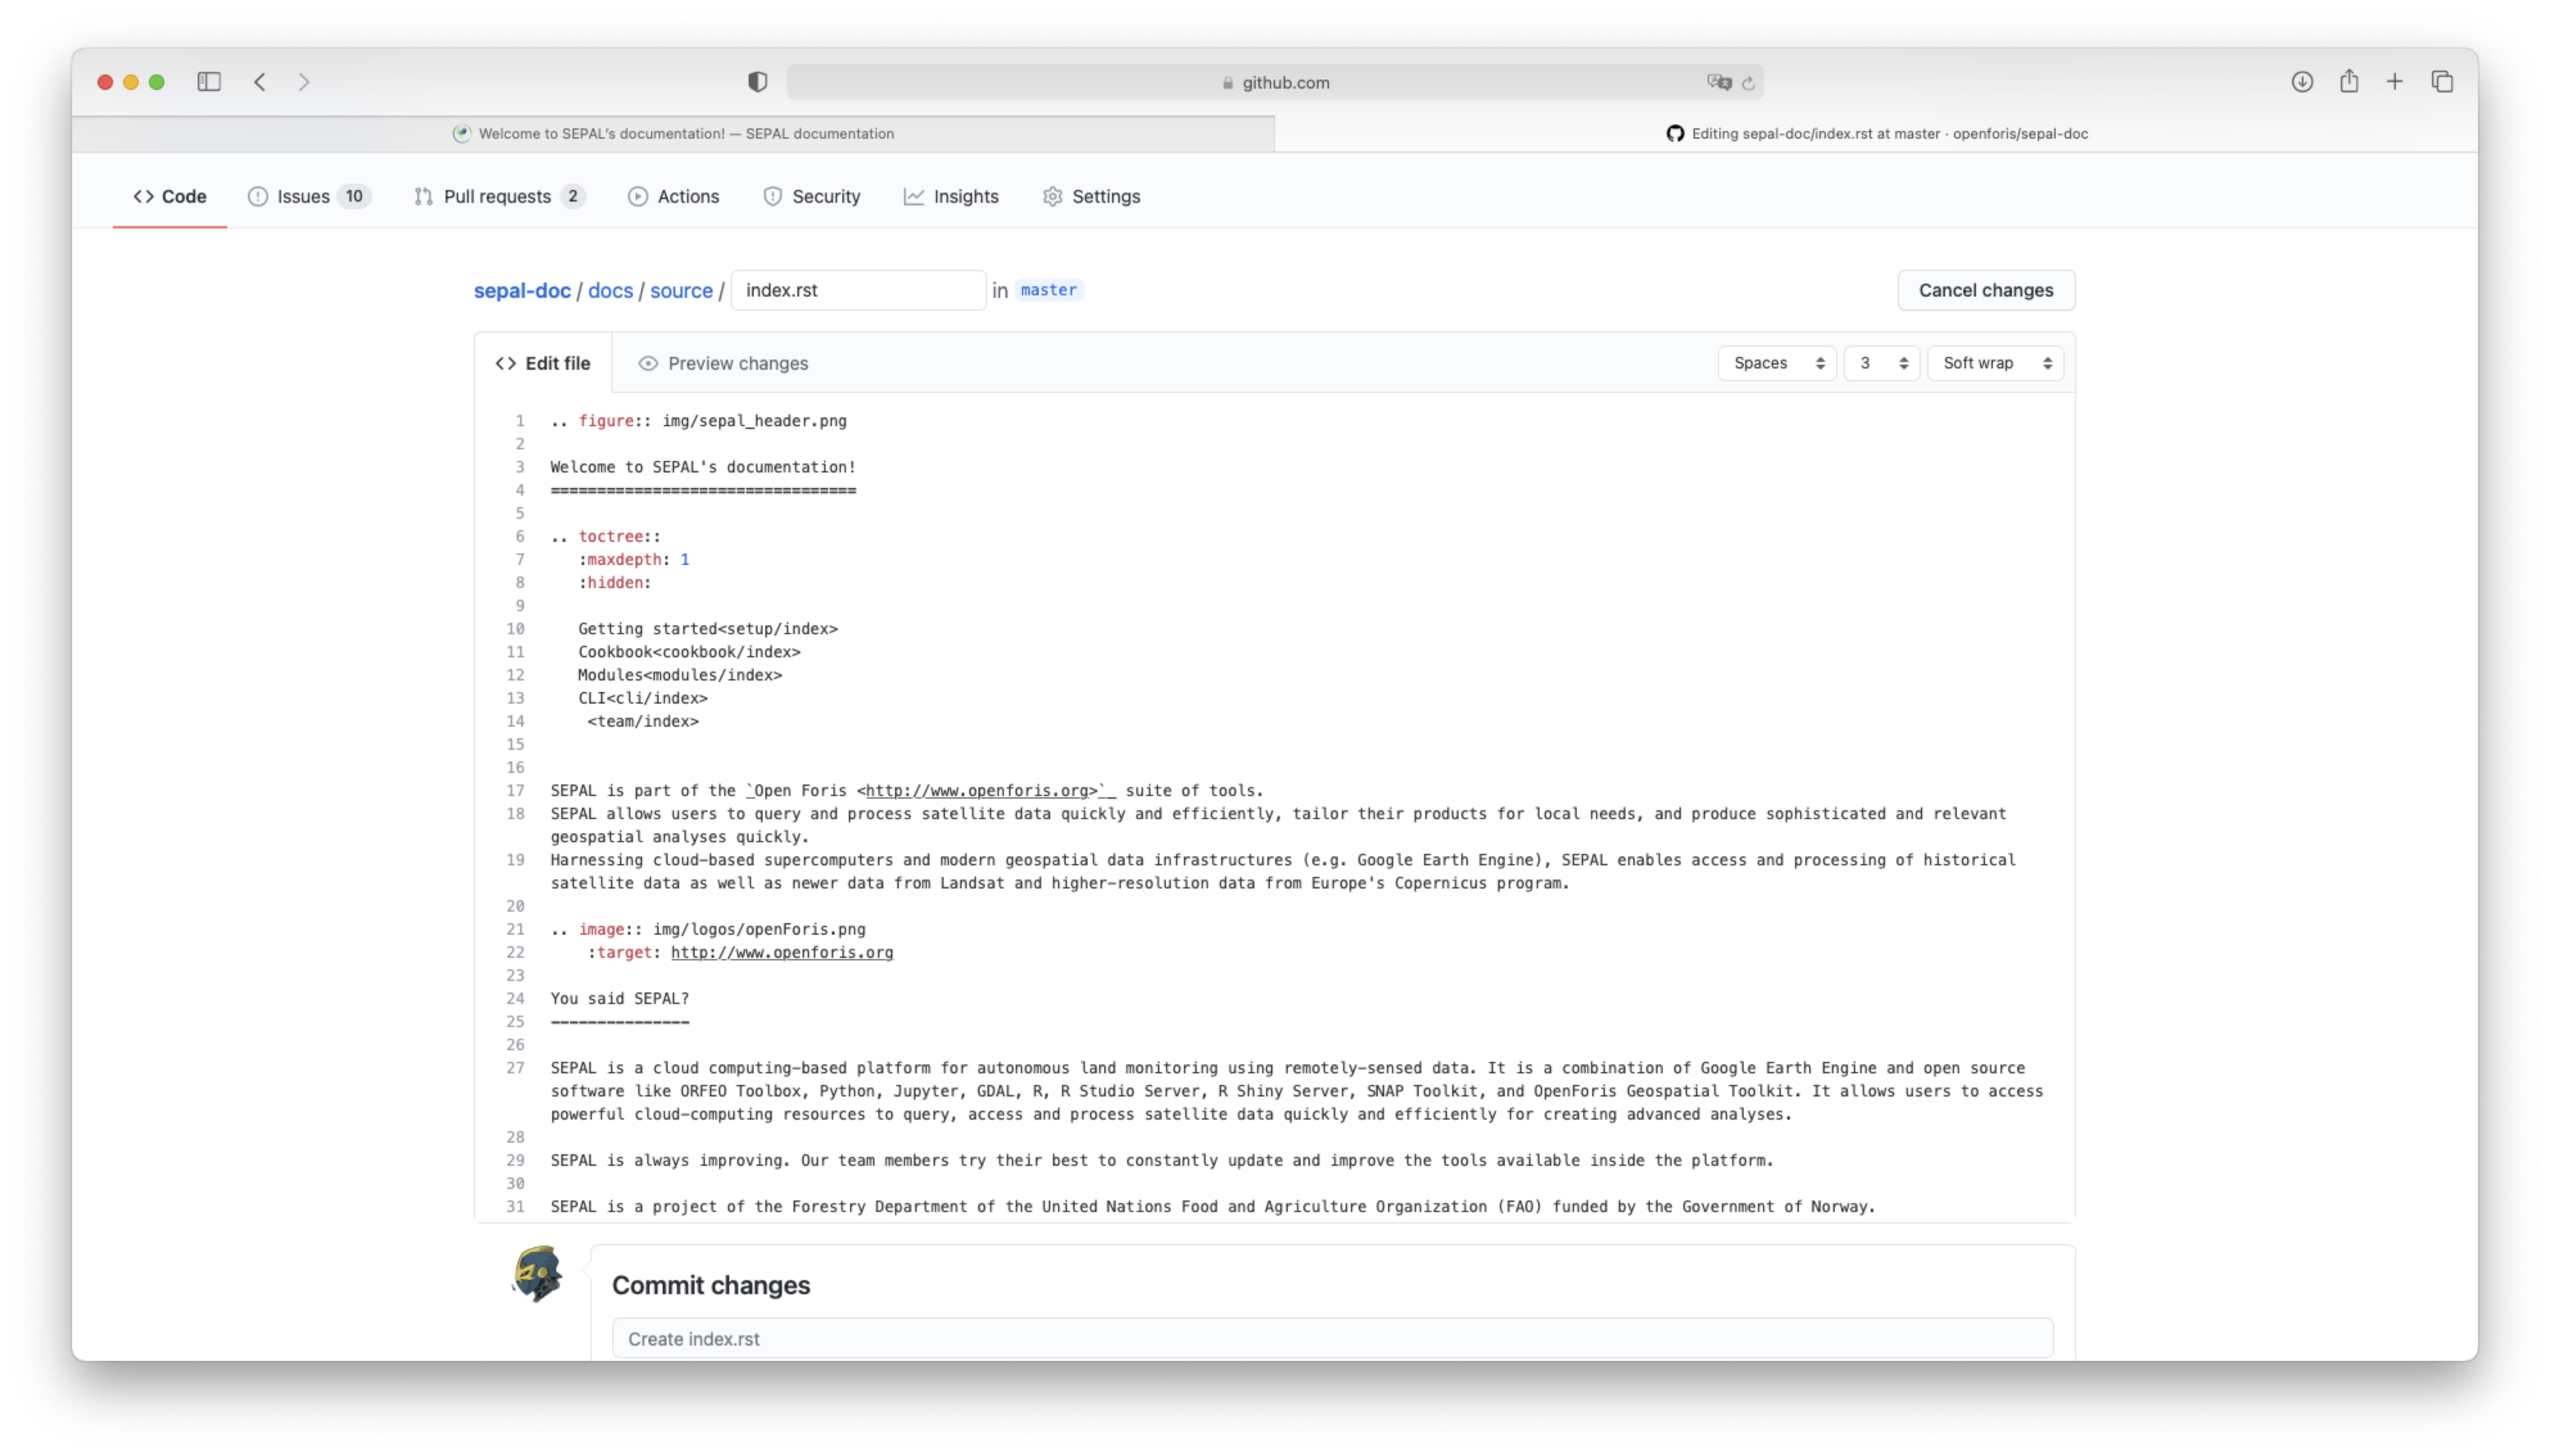
To ensure that your modifications are clear, change the title of the Commit by completing the first field (i.e. inserting an explanation such as Typo, Change image, Code-block error – anything that concisely describes your modifications).
When correcting anything, create a Branch.
Once you’ve finished, a PR will be created in the Open Foris repository. Remove all comments, as you’re not making a real PR, but an adjustment (normally the title will automatically be set with the name of your Commit).
Select Create pull request.

Note
Once your PR is accepted, you will be notified. Please consider deleting your Branch.
Module edit#
The Edit on GitHub button will not work for articles in the Modules section, as the files are retrieved from each module’s repository.
Their should be a link at the very bottom of the page to make modifications to the source file in the module repository following the same procedure mentioned above.
Once you’ve finished, notify the SEPAL team, who will need to manually rebuild the documentation to retrieve the latest version of the file you modified.
Note
If you want to add a new module to the documentation, see the following section.
Major changes#
Major changes include:
creating new documentation pages (i.e. articles);
modifying multiple images;
making new sections;
building new modules; and
adding new classes on Google Classroom.
For these major changes, the simple GitHub edit process does not work. Rather, you need to follow another workflow that allows you to modify multiple files at the same time and use the PR system to avoid publishing new pages without validation.
In this subsection, we will present the full process to make major changes.
Fork project#
To work on multiple files at the same time, you cannot work directly from GitHub. Rather, you need to install a local version of the source.
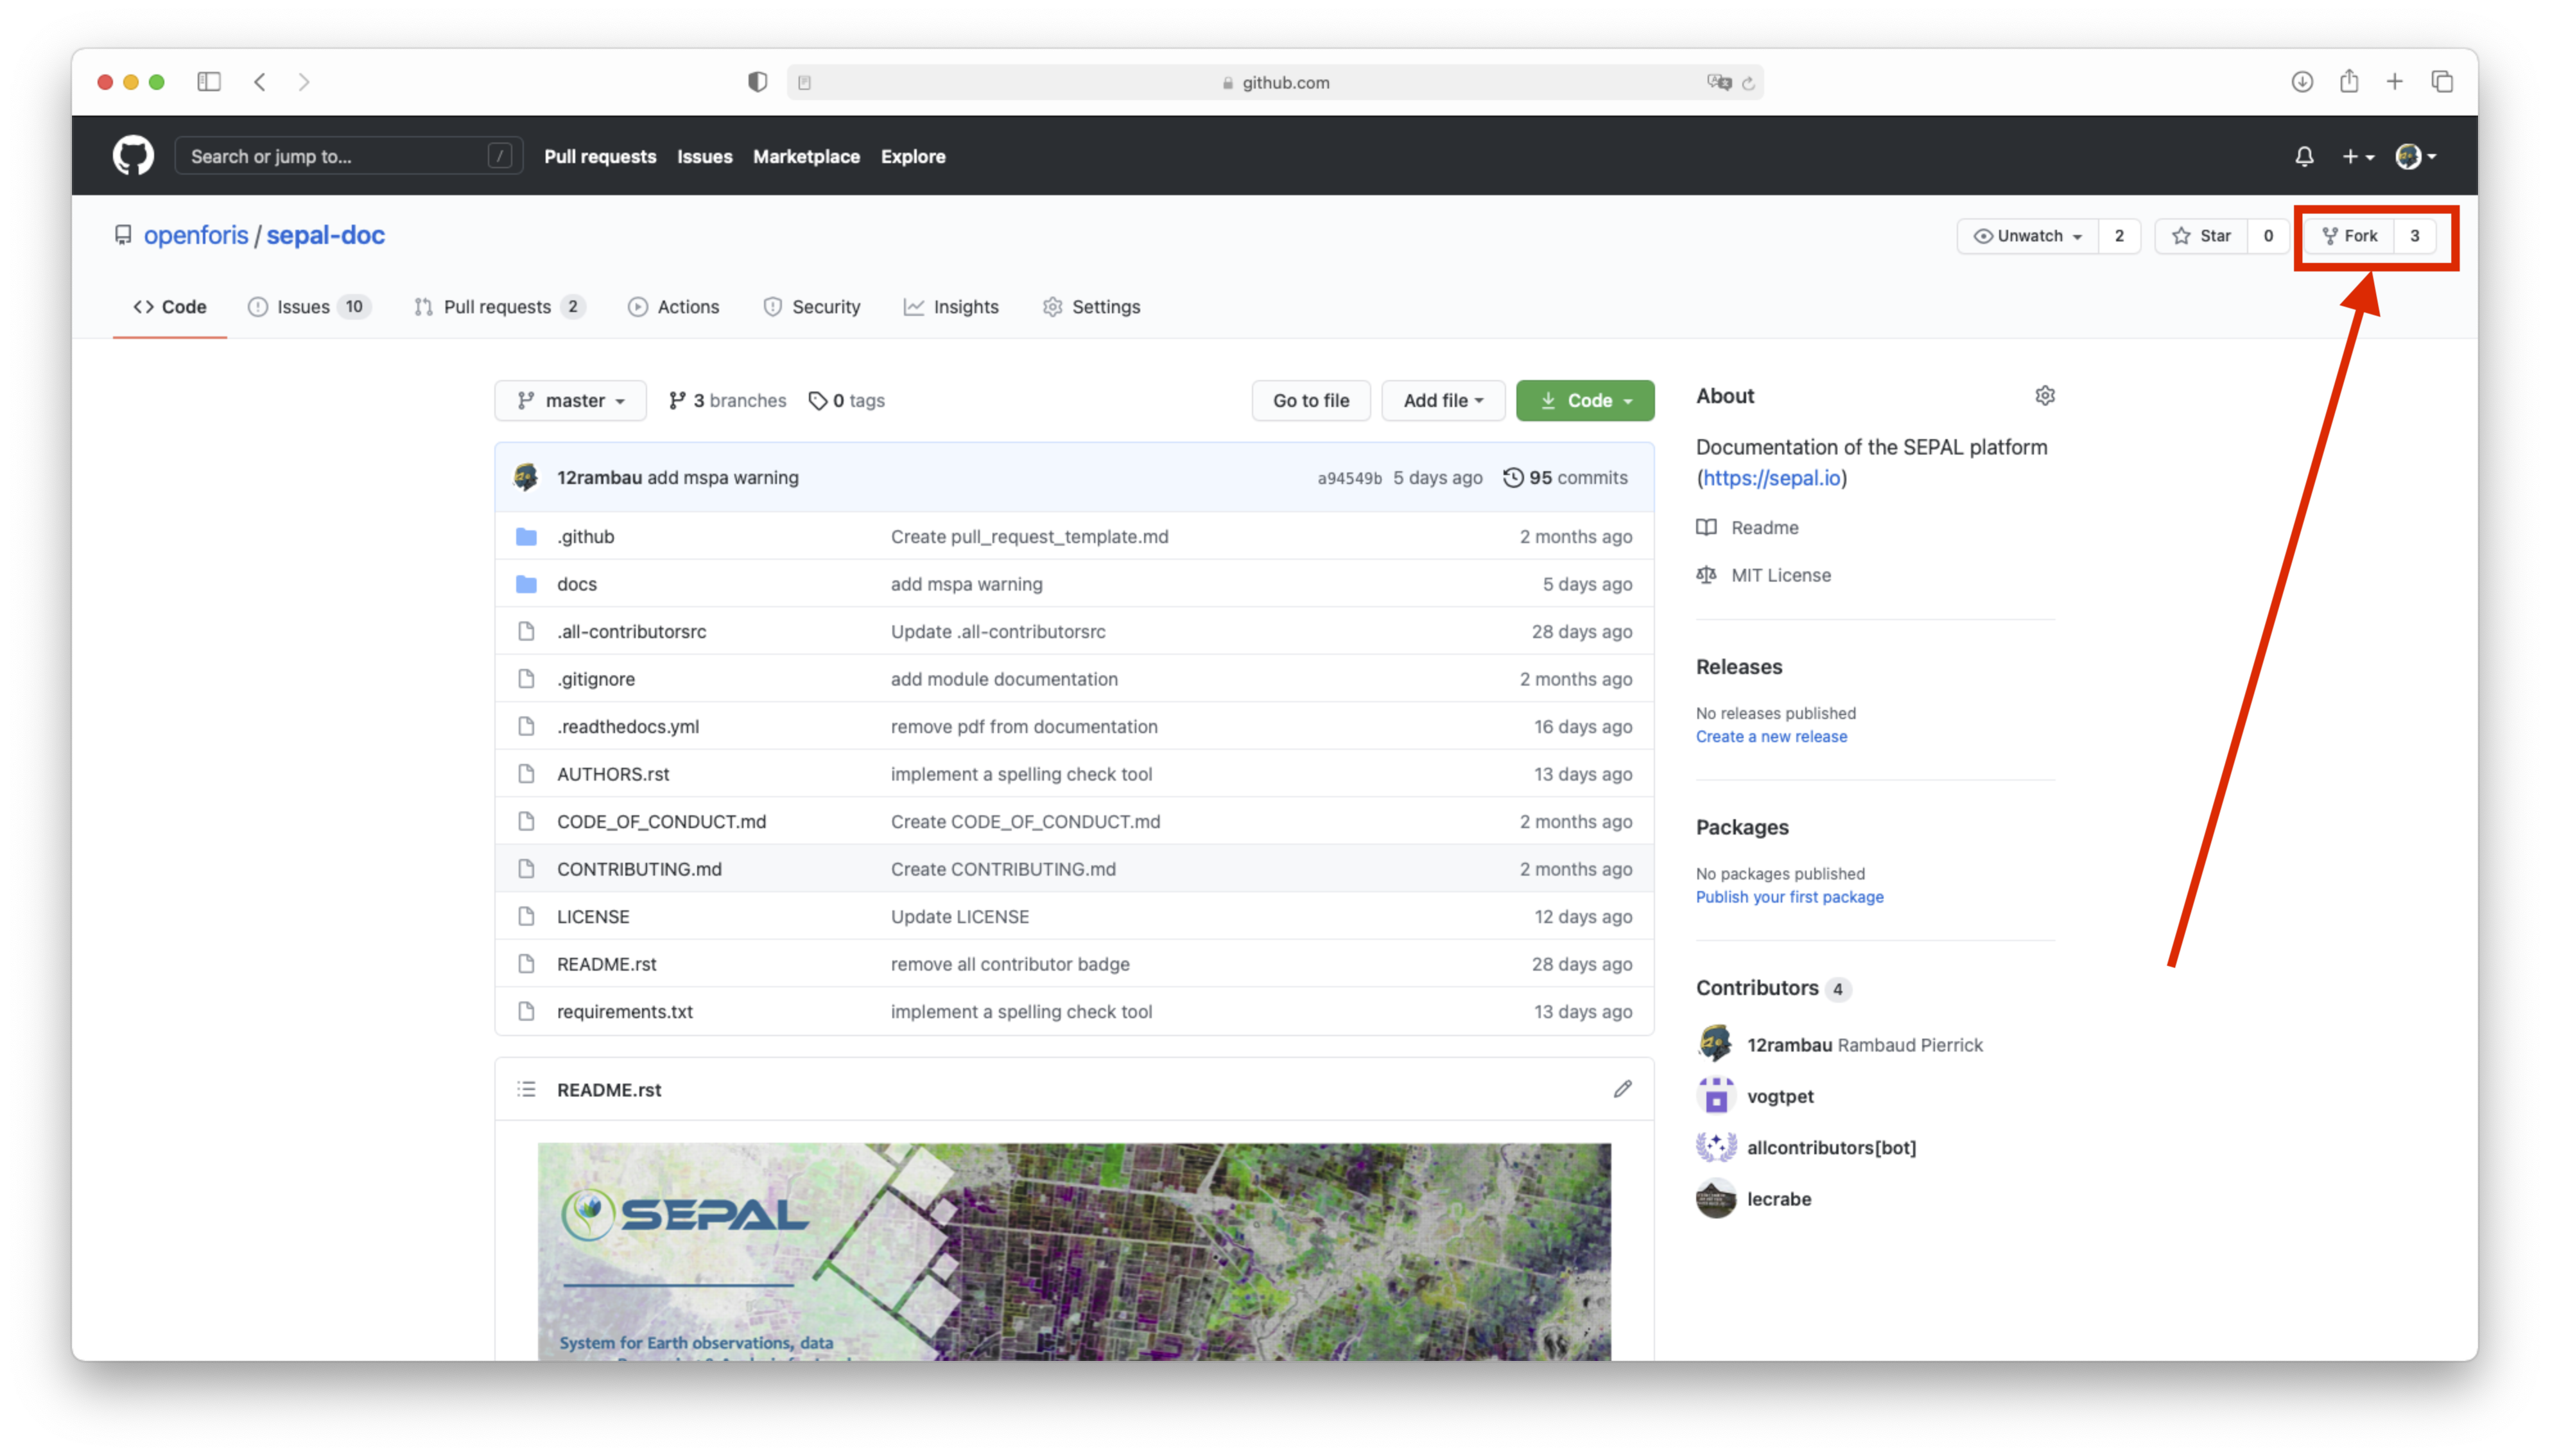
To avoid the publication of low-quality documentation, SEPAL users don’t have the rights to directly push edits to master files. Instead, you must fork the project into your own account by selecting the fork button in the upper-right corner of the GitHub page of the documentation:
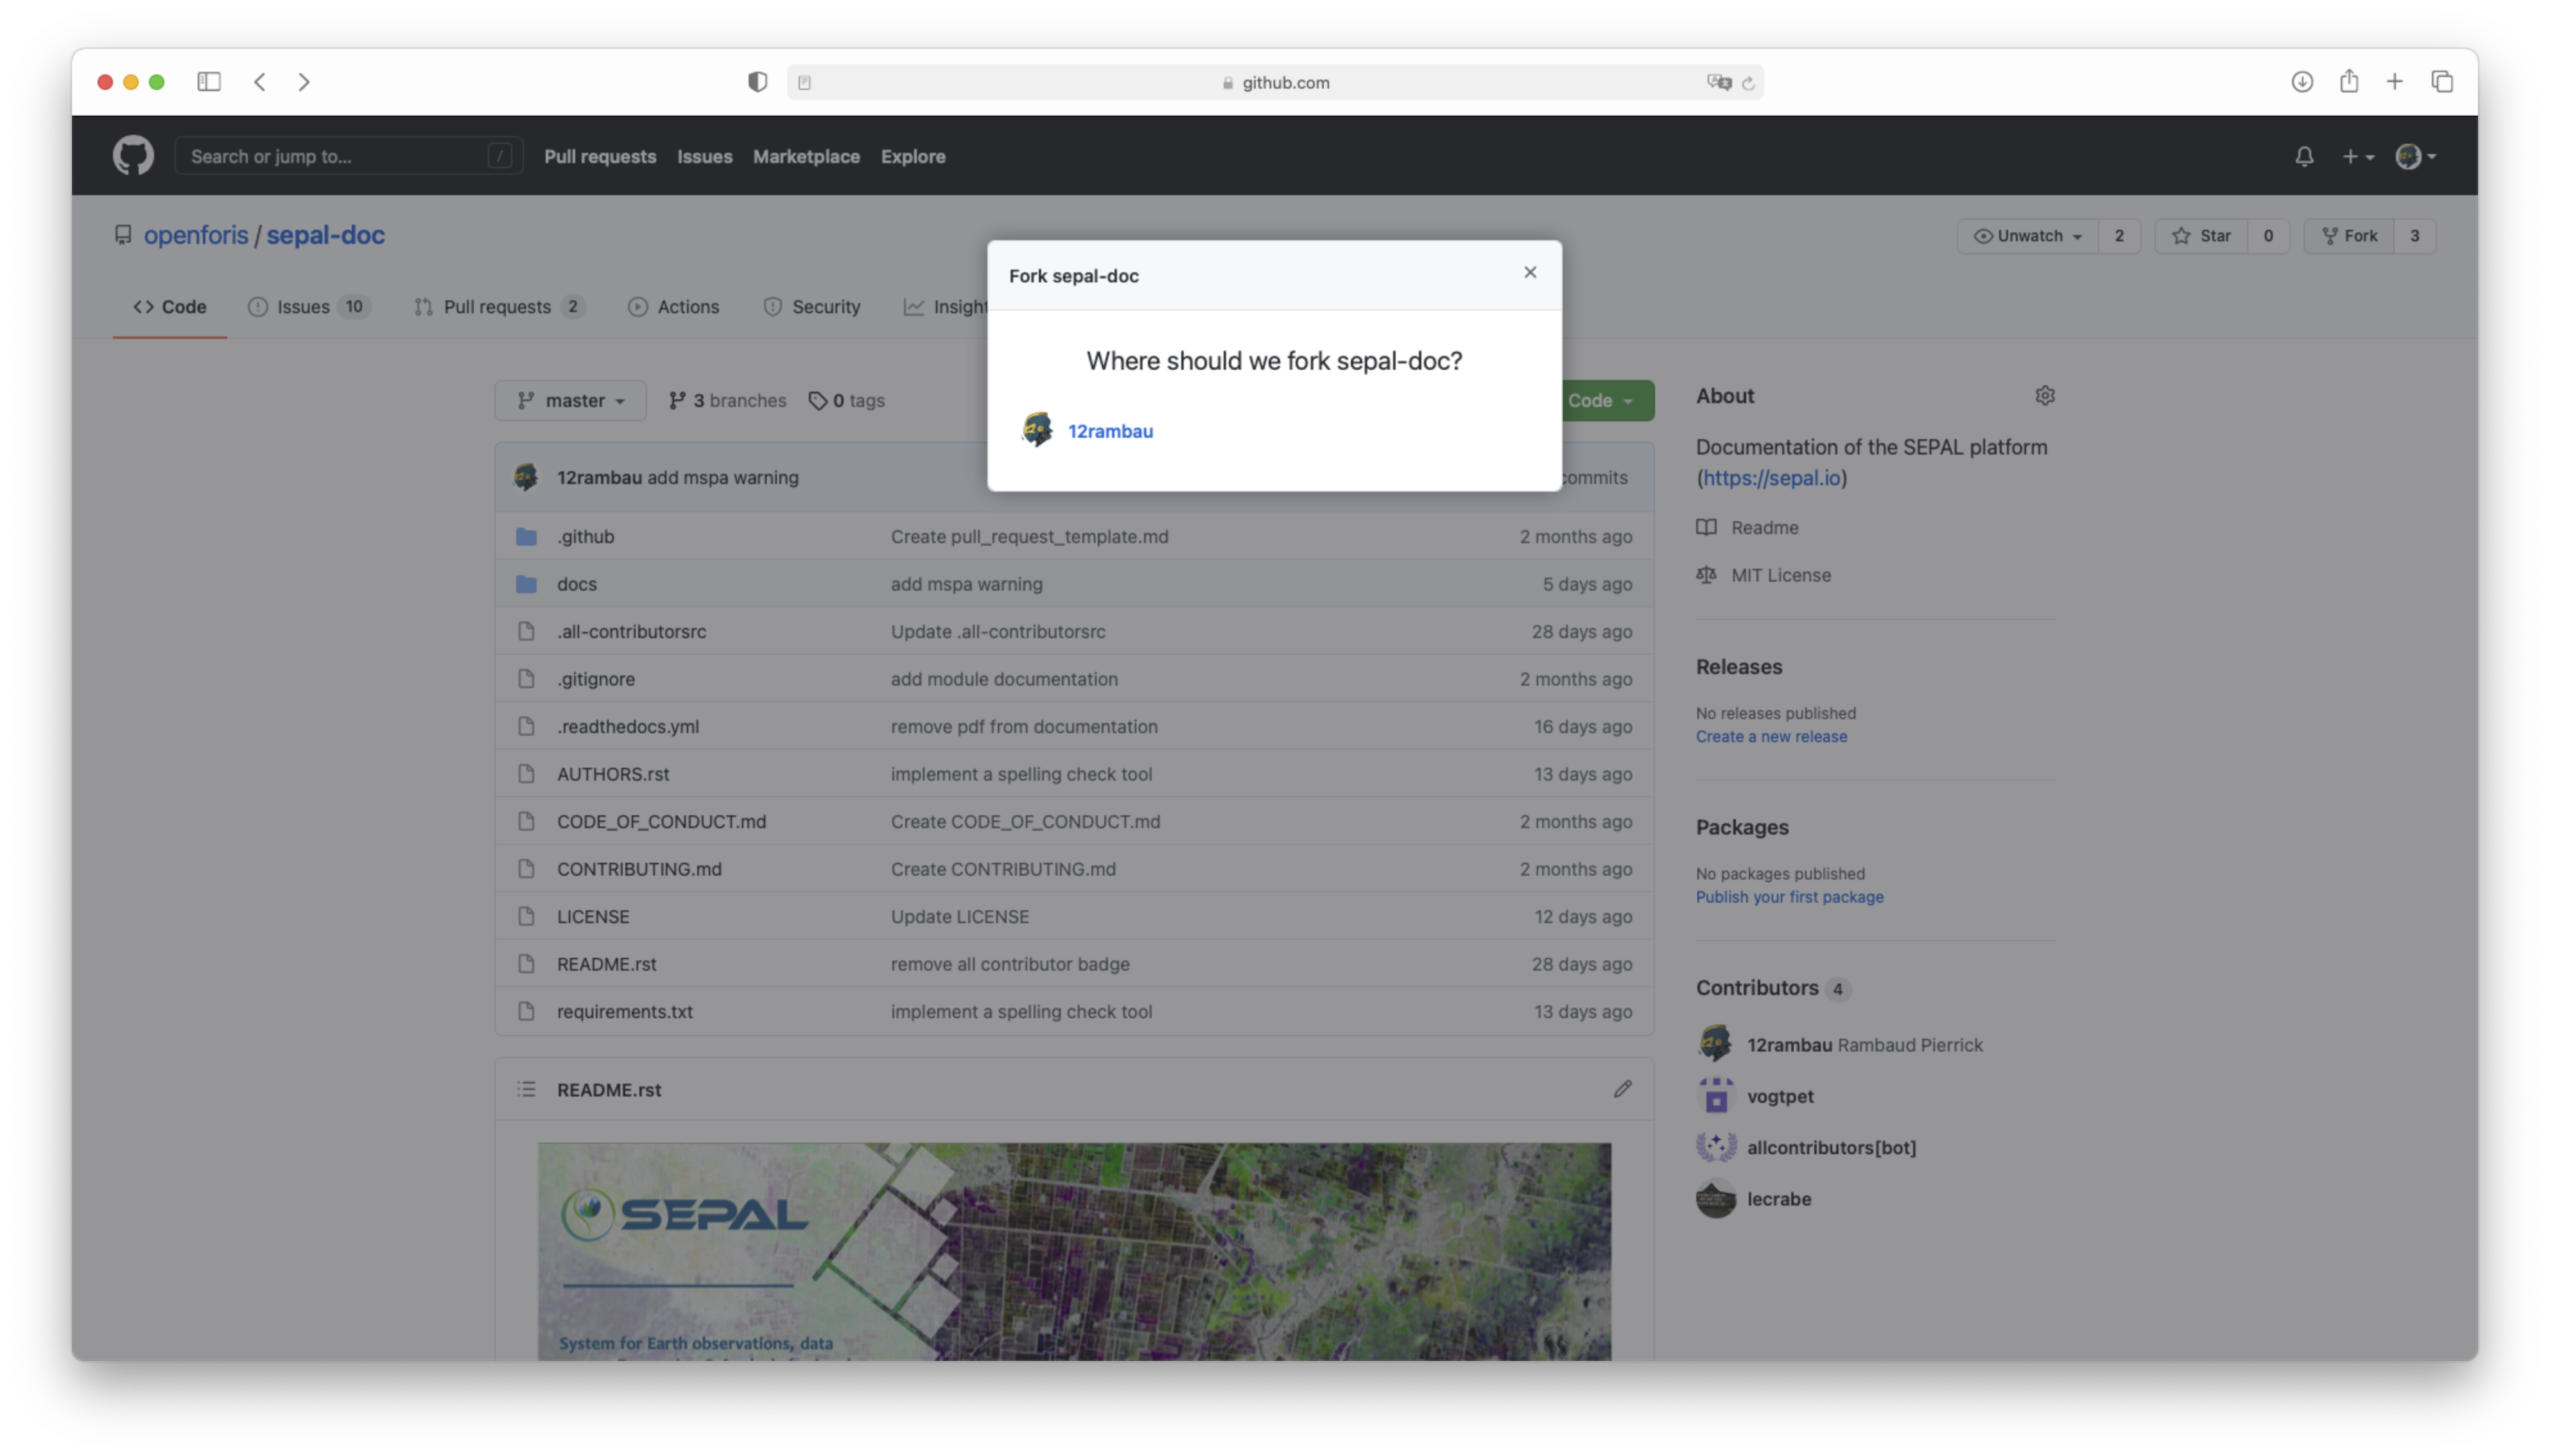
In the Fork pop-up window, select the account you want to use:
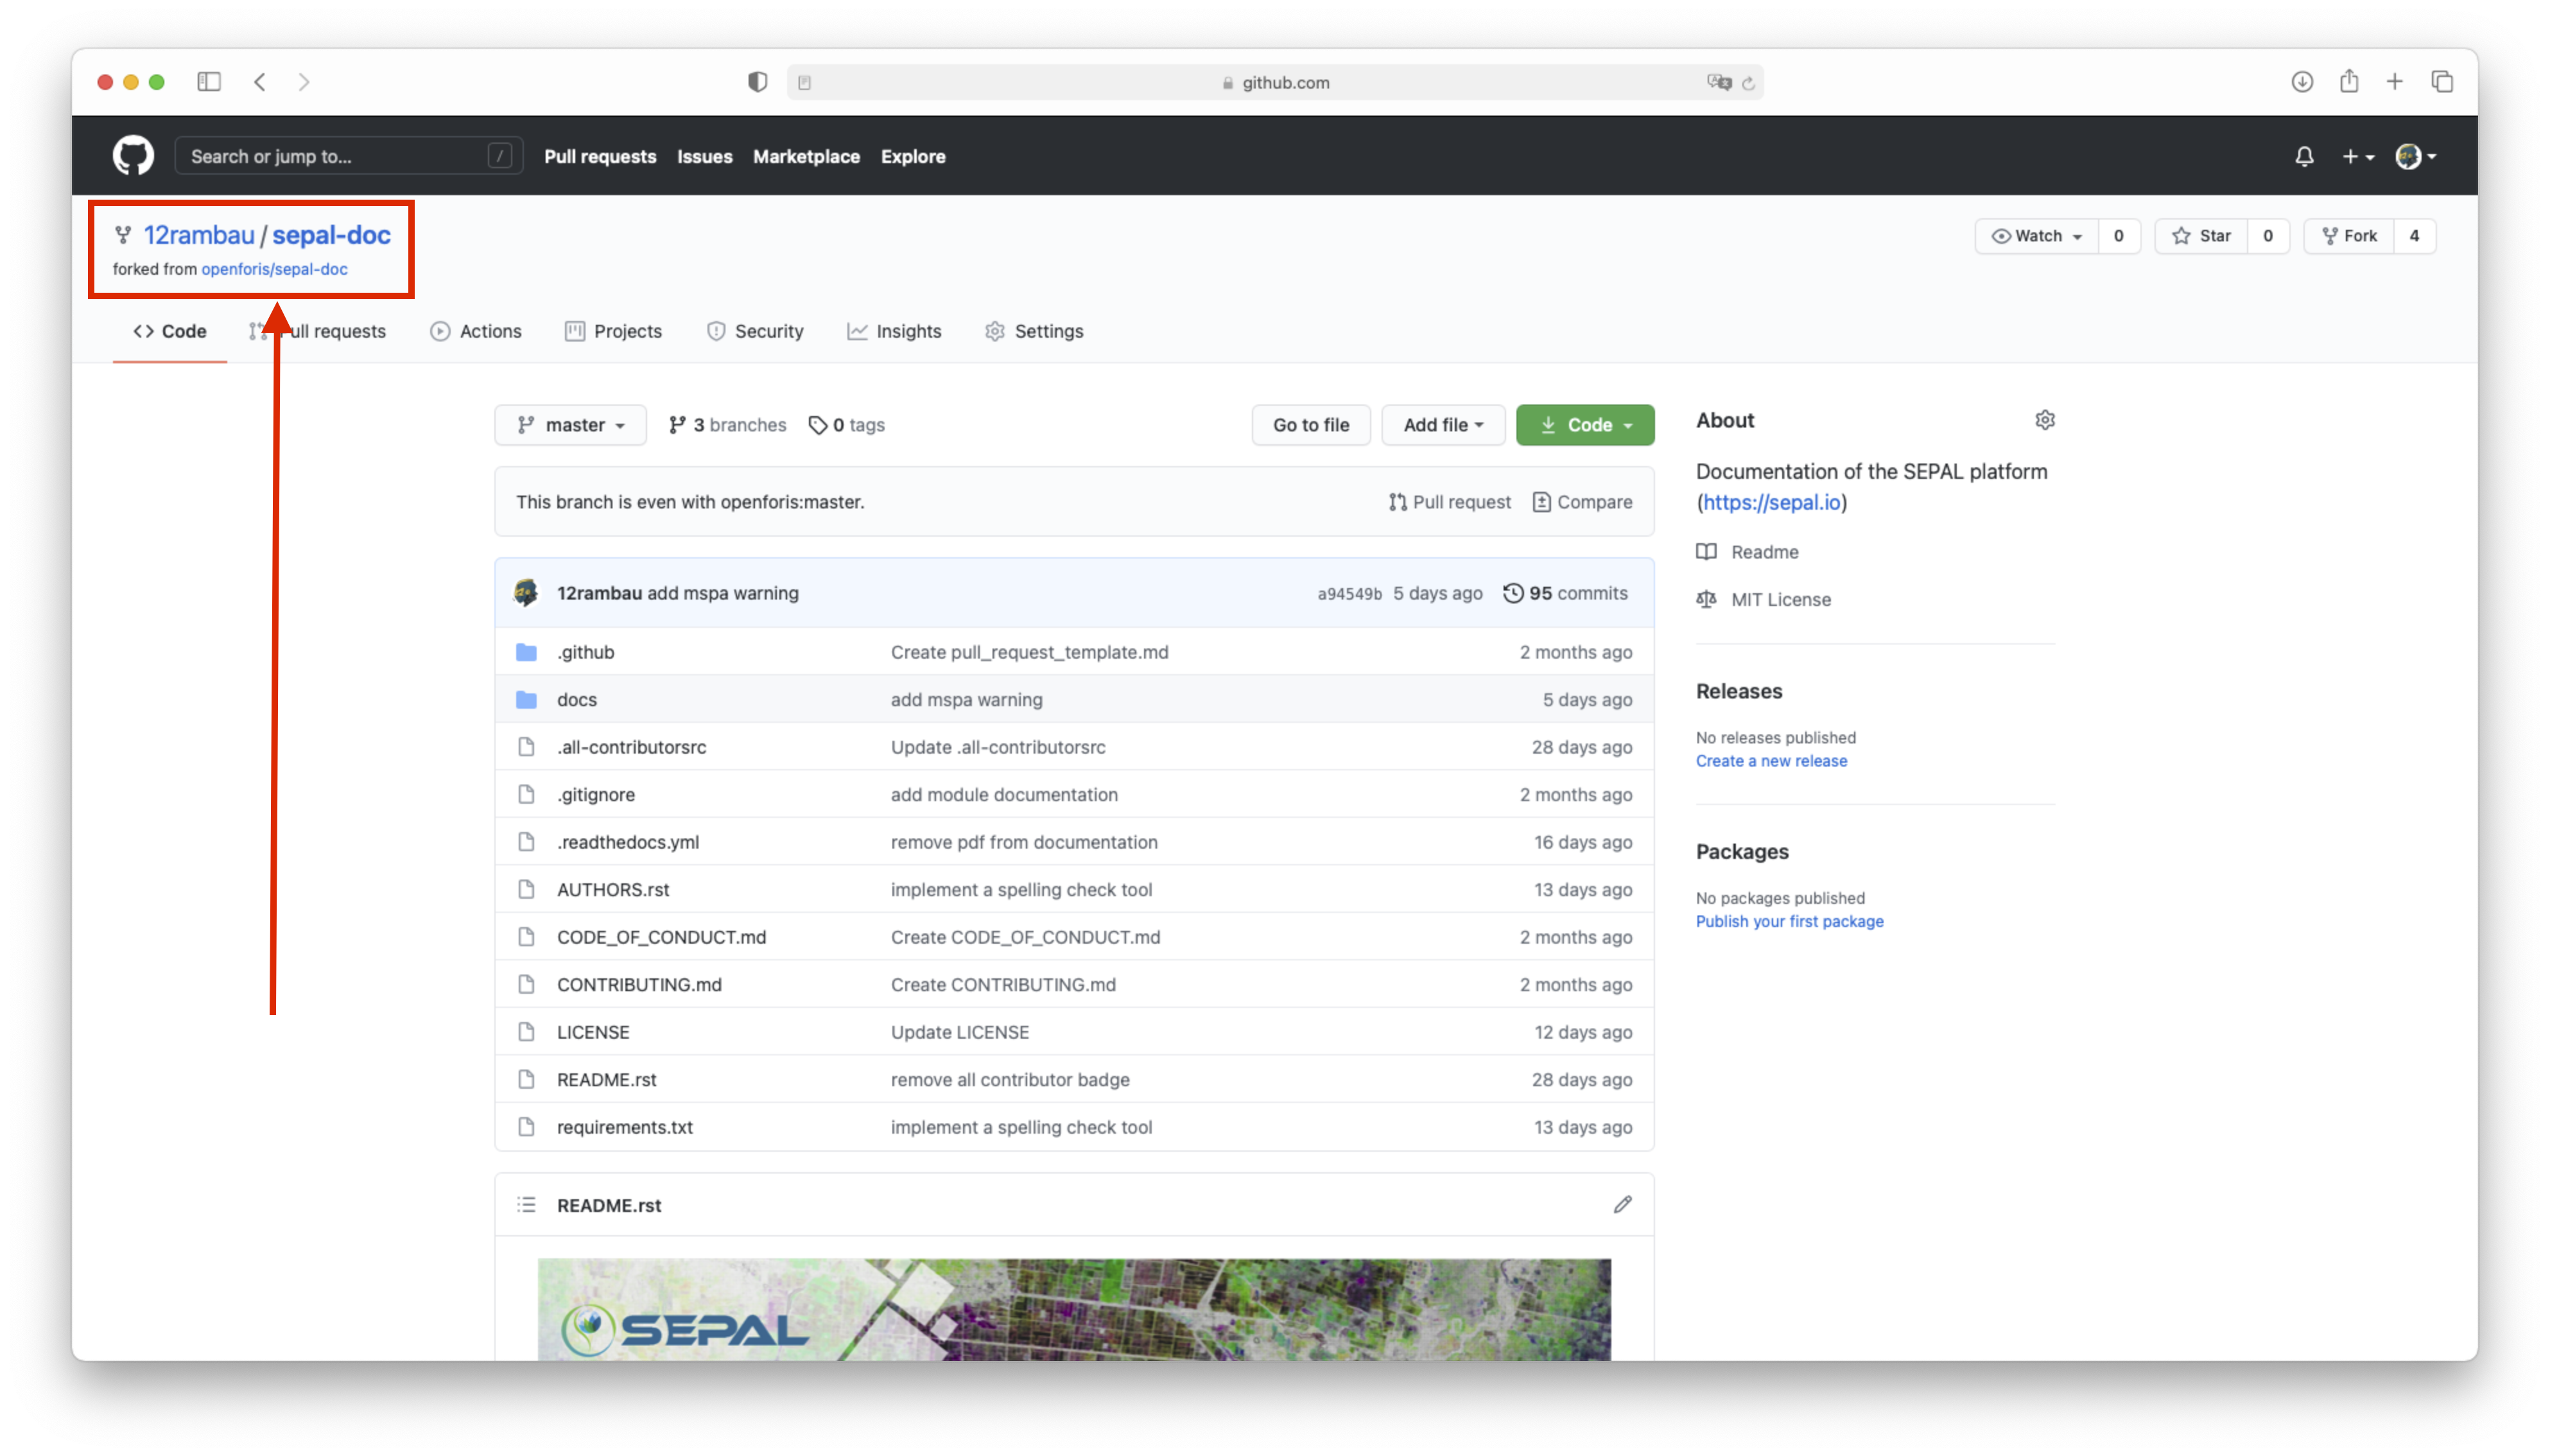
In the upper-left side of the following page, you can see your location. This repository is stored in your account, but it’s a fork of the original openforis/sepal-doc file.
Note
To learn more about the forking system in GitHub, see this article.
We are now ready for local installation.
Local installation#
Install the forked project locally to make your modifications.
On your computer, go to a terminal and run the following command.
Important
Don’t forget to change your account to the account name where you forked the project.
git clone https://github.com/<your account>/sepal-doc.git
Once the code is installed on your computer, install the packages that are required to build the documentation by running the following command:
pip install -U -r sepal-doc/requirements.txt
To check that the documentation can be built without error, go to the doc folder and run the following command:
cd sepal-doc/docs
make html
Note
The SEPAL team has attempted to minimize the chances of experiencing warnings in the master branch. If warnings are displayed, ignore them; the SEPAL team will address them as soon as possible.
A new folder, build, has been created in your sepal-doc folder.
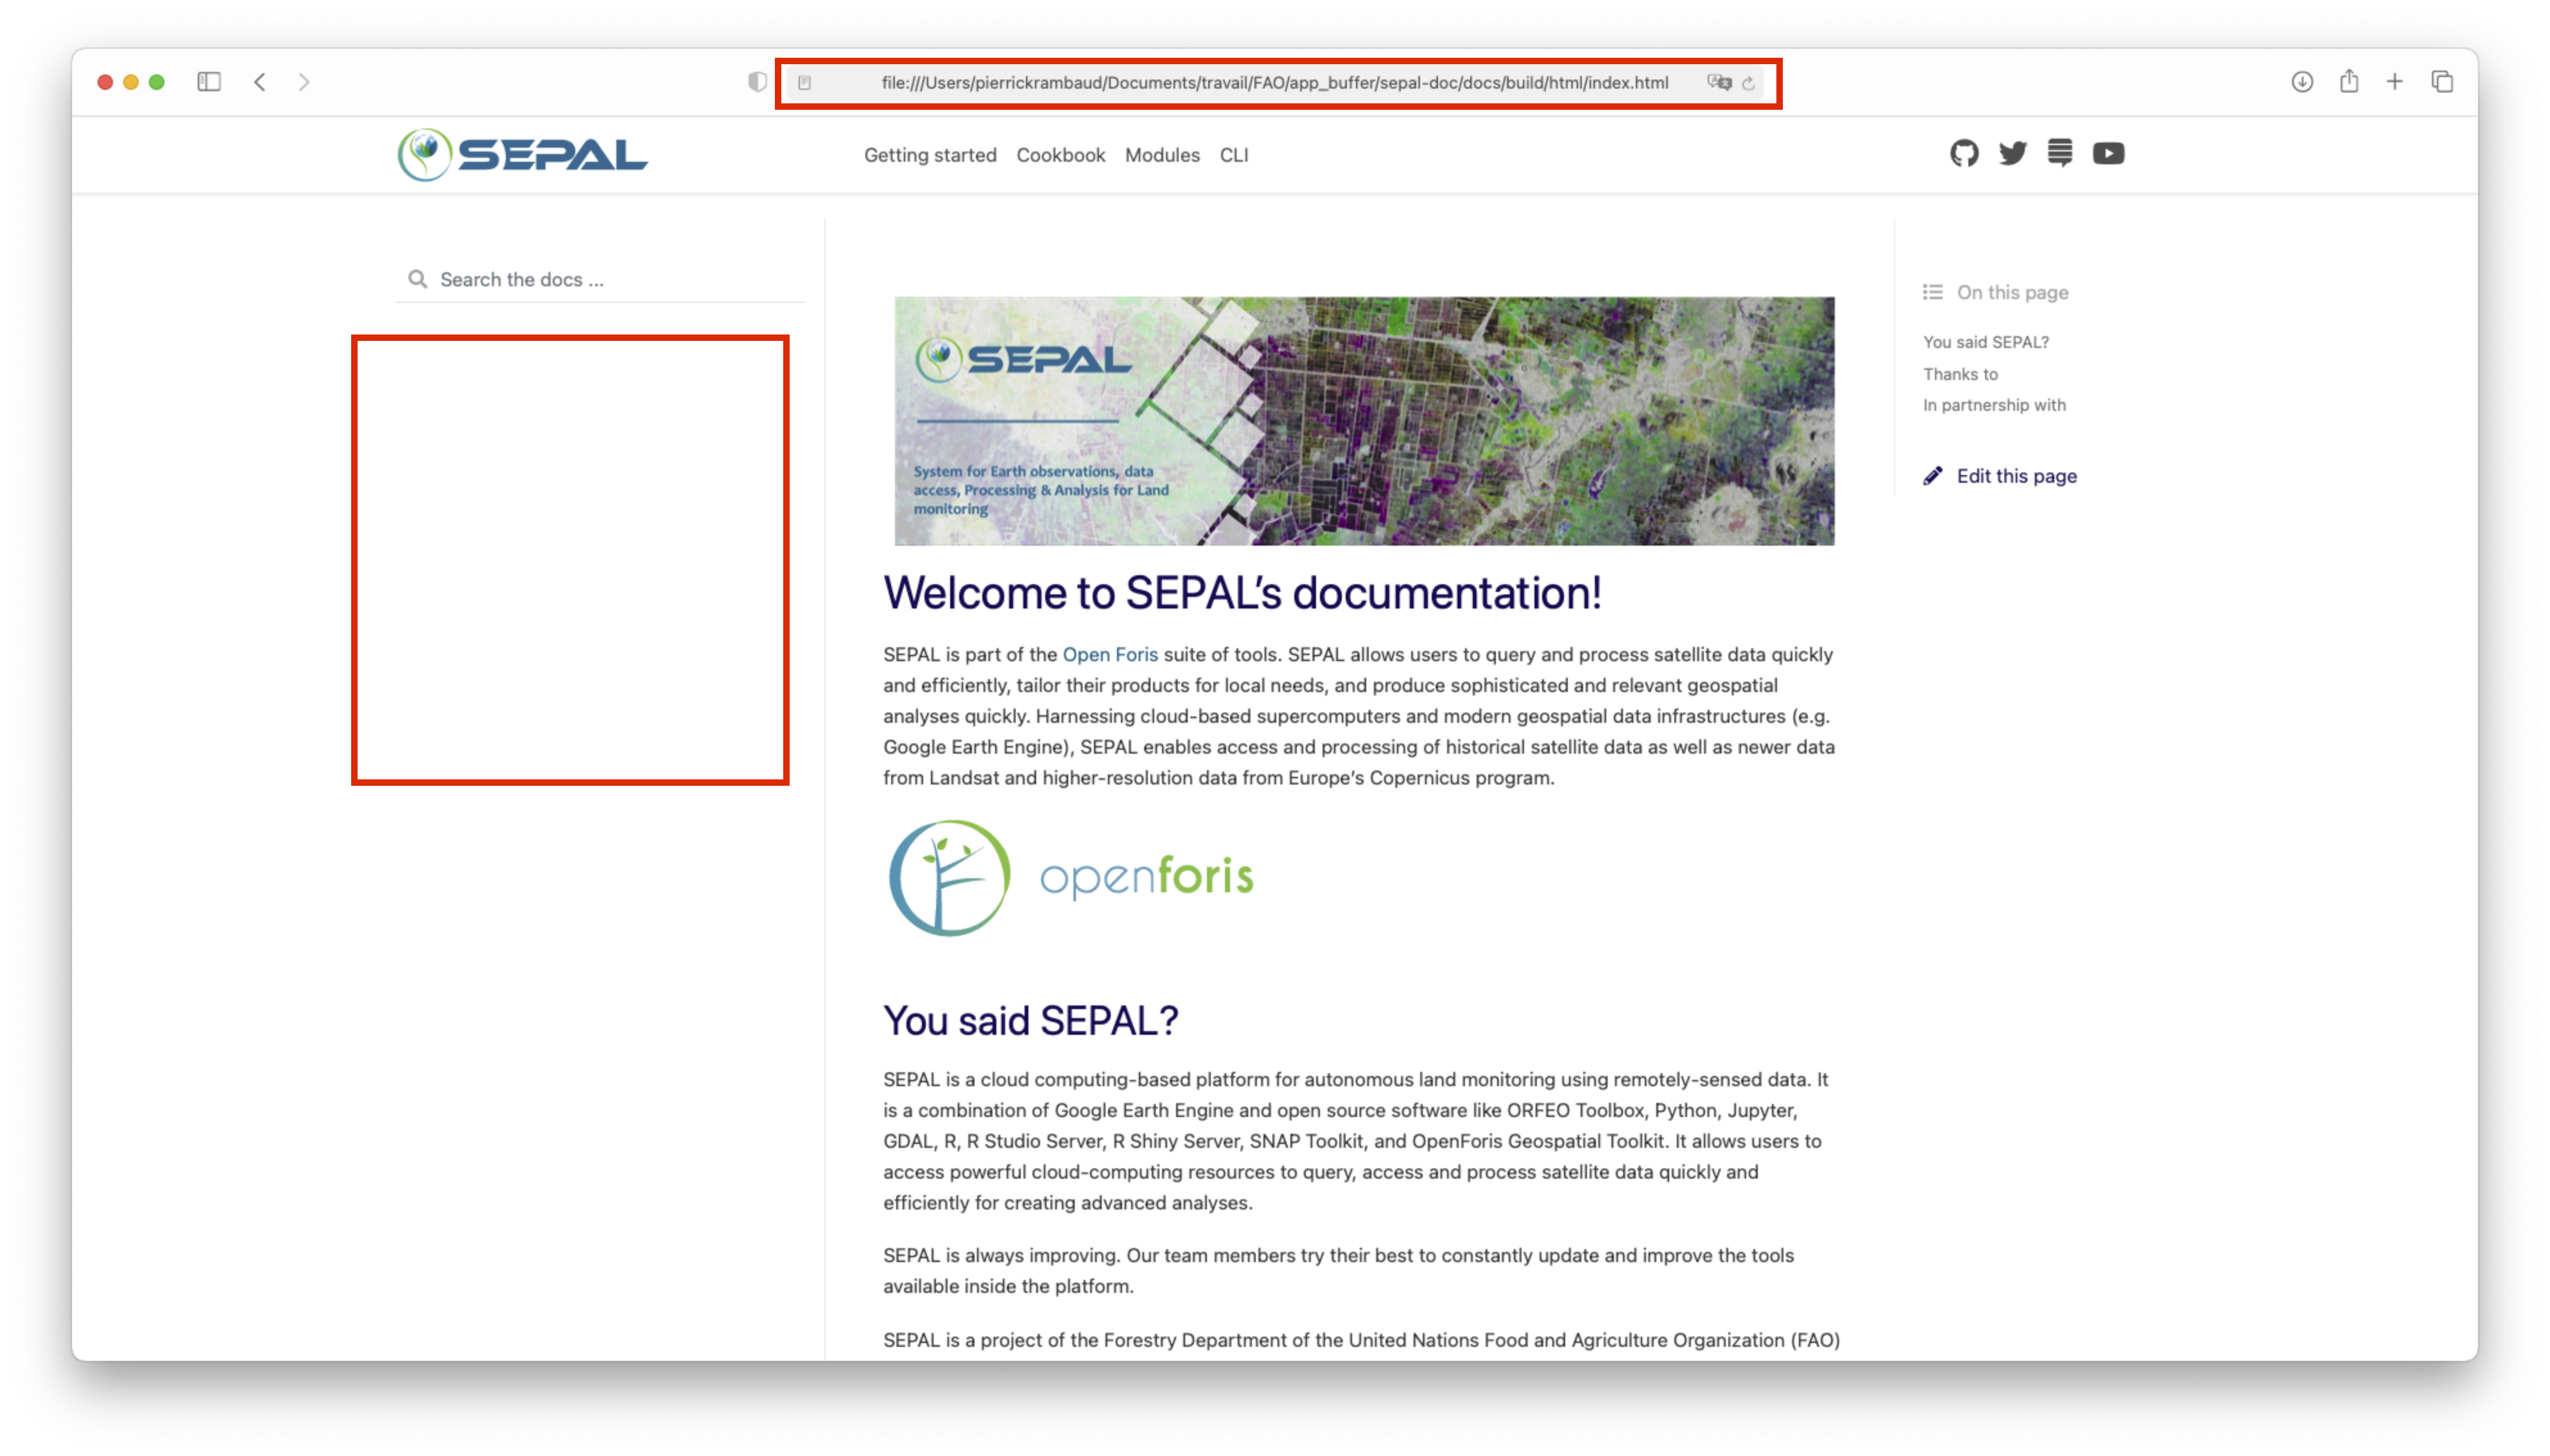
Double-click on sepal-doc/docs/build/html/index.html.
Your browser should open and load the landing page of SEPAL documentation. (Note: It will be a local .html page. The URL at the top of the browser should start with file:// rather than https:// and there should be no advertisements in the side bar.)
We can now start to code our modifications.
Tip
This procedure can also be performed in the SEPAL platform by starting a t1 instance and executing the same process.
To open the .html page, use JupyterLab, since it is able to load .html content (JupyterLab is also an excellent integrated development environment [IDE] to make modifications, since it recognizes .rst format).
Modify the doc#
Each type of modification will be treated separately, since they don’t imply the same code structure. While doing local modifications, don’t hesitate to run the following command in the sepal-doc/doc/ folder to check the page that you’re modifying, as it will help you see typos and mistakes with directives:
make html
If you would like to make many modifications, you should create multiple commits (from the sepal-doc/docs/ folder).
When making modifications, always include clear, concise commit messages (if you cannot find the appropriate commit message, you have done too many things and should consider creating multiple commits instead).
git add ../
git commit -m "<your message>"
Once you are done with your modifications, push the repository to GitHub and continue to the next section:
Get push
New page#
Open the sepal-doc folder in your preferred IDE.
Note
Any TextEdit software will work as well, though won’t be as user-friendly.
As previously explained, the folder has a specific structure corresponding to the Sphinx template, which we are using to build the final documentation.
The first step will be to identify the section where you would like to store your page.
The following sections are currently available:
Getting started – Everything you need to know to use SEPAL; located in the
sepal-doc/docs/source/setup/folder.Cookbook – How to use different recipes available in SEPAL; located in the
sepal-doc/docs/source/cookbook/folder.Modules – The modules available in the App dashboard; located in the
sepal-doc/docs/source/modules/folder.CLI – All command-line interface (CLI) tools installed by default in SEPAL; located in the
sepal-doc/docs/source/cli/folder.Workflows – Different combinations of SEPAL tools and recipes to perform complex data analyses; located in the
sepal-doc/docs/source/workflows/folder.Features – Features that are available across various recipes and modules to analyse, combine and visualize different types of data; located in the
sepal-doc/docs/source/feature/folder.Team – A hidden section only available to team members that helps them contribute to the platform; located in the
sepal-doc/docs/source/team/folder.
Note
In the Module section, only the index.rst file should be modified, as the others are downloaded from their repository (see the section New module below).
Attention
If you create a team page, the first line of your .rst file should always be:
.. include:: disclaimer.rst
Now that you have selected a section, you can create a new documentation page (<my_page>.rst) using all .rst directives available in Sphinx, as well as the directives presented in the first section of this article.
To maintain consistency across folders and help with image maintenance, the images you use should be stored in the following folder: sepal-doc/docs/source/_images/<section>/<page>/.
Add the page you’ve created to the toctree (Table of contents) directive in the <section>/index.rst file by adding your filename – without the extension – respecting the following indentation:
.. toctree::
    :maxdepth: 1
    :hidden:

    page1
    page2
    my_page
    page3
The title of your page should appear as a link in the Section navigation pane on the left side of your browser.
If you forget to link your page, you will see the following message:
<source_dir>/sepal-doc/docs/source/<section>/<my_page>.rst: WARNING:
The document is not included in any table of contents in the tree structure.
Tip
If you are struggling with .rst, get support by asking the Google Group community.
Modify images#
Images for each page are saved in the mirror folder, sepal-doc/docs/source/_images/, which reproduces the structure of sepal-doc/docs/source.
Open the page you want to modify and search for the .. image or .. figure directive for the image you want to modify. You just need to change the image in the _images/ folder and continue using the same name.
If you think an image is missing, you can add one to any page by placing the image in the appropriate folder, and then naming it using one of the following directives (making sure to include the alt text, which will be the only information displayed if your image fails to load).
The
figuredirective adds padding to the bottom of the image and allows you to add a caption... figure:: ../_images/<section>/<page>/<image>.png :alt: <The image callback text>
The
imagedirective is easier to manipulate, but has fewer functionalities... image:: ../_images/<section>/<page>/<image>.png :alt: <The image callback>
New section#
Attention
The documentation should not require new sections; however, if you believe that something needs to be added, let the SEPAL team know via the GitHub Issue Tracker.
To add a new section, create a new folder in sepal-doc/docs/source/. This folder should contain at least one page that contains the following code:
<Section title>
===============

.. toctree::
    :maxdepth: 1
    :hidden:
This section page should be added to the Documentation index.
Modify the toctree of sepal-doc/docs/source/index.html by replacing <section> with the folder name and Section name with the name you would like to see in the navigation bar.
.. toctree::
    :maxdepth: 1
    :hidden:

    Getting started<setup/index>
    Cookbook<cookbook/index>
    Modules<modules/index>
    CLI<cli/index>
     <team/index>
    Section name<<section>/index>
New modules#
Have you created a new Shiny or Python-based module and been asked to add it to the App dashboard of SEPAL, following the Issue template?
One of the requirements to have your module accepted by the SEPAL team is to create a documentation file.
To maintain consistency across modules, we store the documentation in the module’s original repository.
To create the actual documentation page, follow the instructions provided in the sepal_ui doc.
Then, modify the sepal-doc/docs/source/data/modules/en.json file in sepal-doc to make your documentation available by adding a new line with the following shape:
{
    "module_name": "https://raw.githubusercontent.com/<account>/<repository>/master/doc/en.rst"
}
This file will be pulled at each build of the documentation in the
sepal-doc/docs/source/modules/dwnfolder.
New class on Google Classroom#
Have you have created a new class under the Google Classroom repository, following the Google Classroom doc? Would you like to add this class to the appropriate class table?
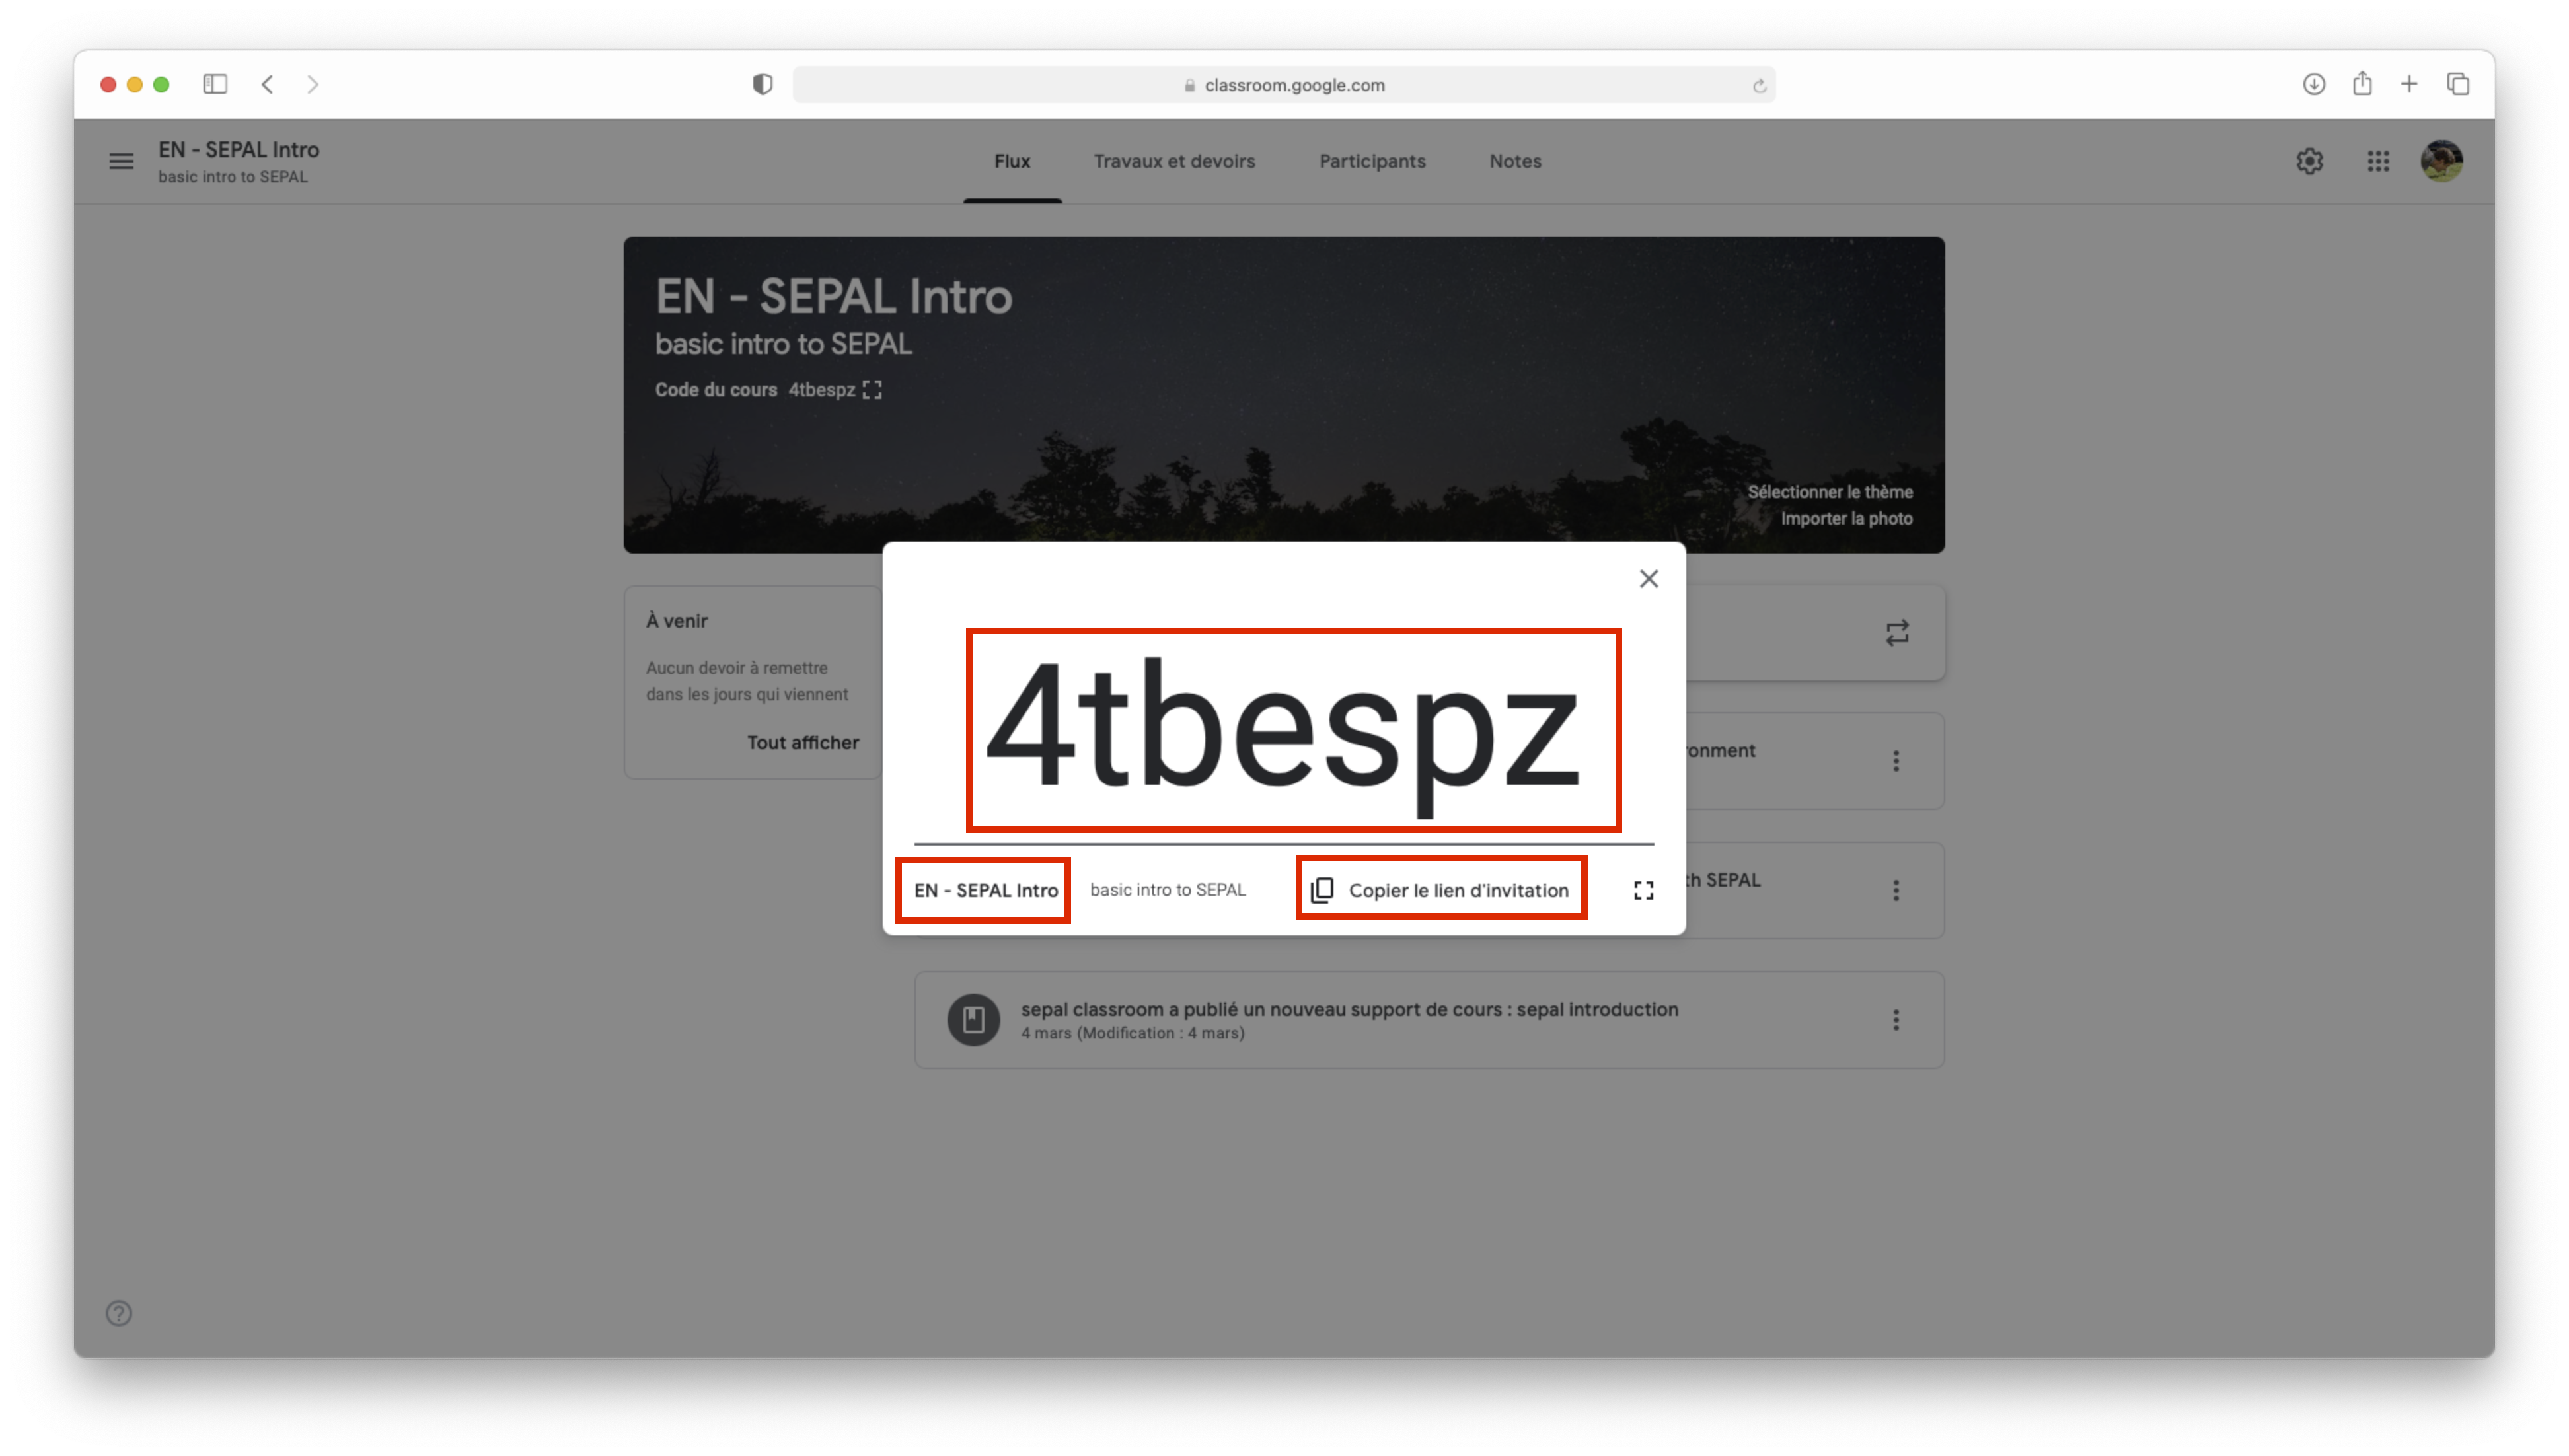
Go to your Google Classroom page and select the Share link. On the next page, copy and paste the following information for the course:
the number
the title
the invitation link
You now have one single file to modify sepal-doc/docs/data/<type>/<locale>.csv:
replace <type> with your class type (general for a reusable piece of documentation and project if linked to a FAO activity)
replace <local> with your class language (only English [en], French [fr] and Spanish [es] are available)
add one extra line at the bottom, as follows:
<title>, `<ID> <<link>>`_, <modification date>
replace <ID> with the class number;
replace <link> with the invitation link;
replace <title> with the class title; and
add the latest <modification date> in YYYY-MM-DD format.
Create a pull request#
Create a pull request#
Note
This article of SEPAL documentation, Contribute, was requested in the GitHub Issue Tracker (Issue #19). It was then added to SEPAL documentation (PR #24).
Now that you have finished your modifications and pushed them to GitHub, go back to the web interface of the forked repository (https://github.com/<your account>/sepal-doc).
First, select the Pull requests button to open the PR interface:
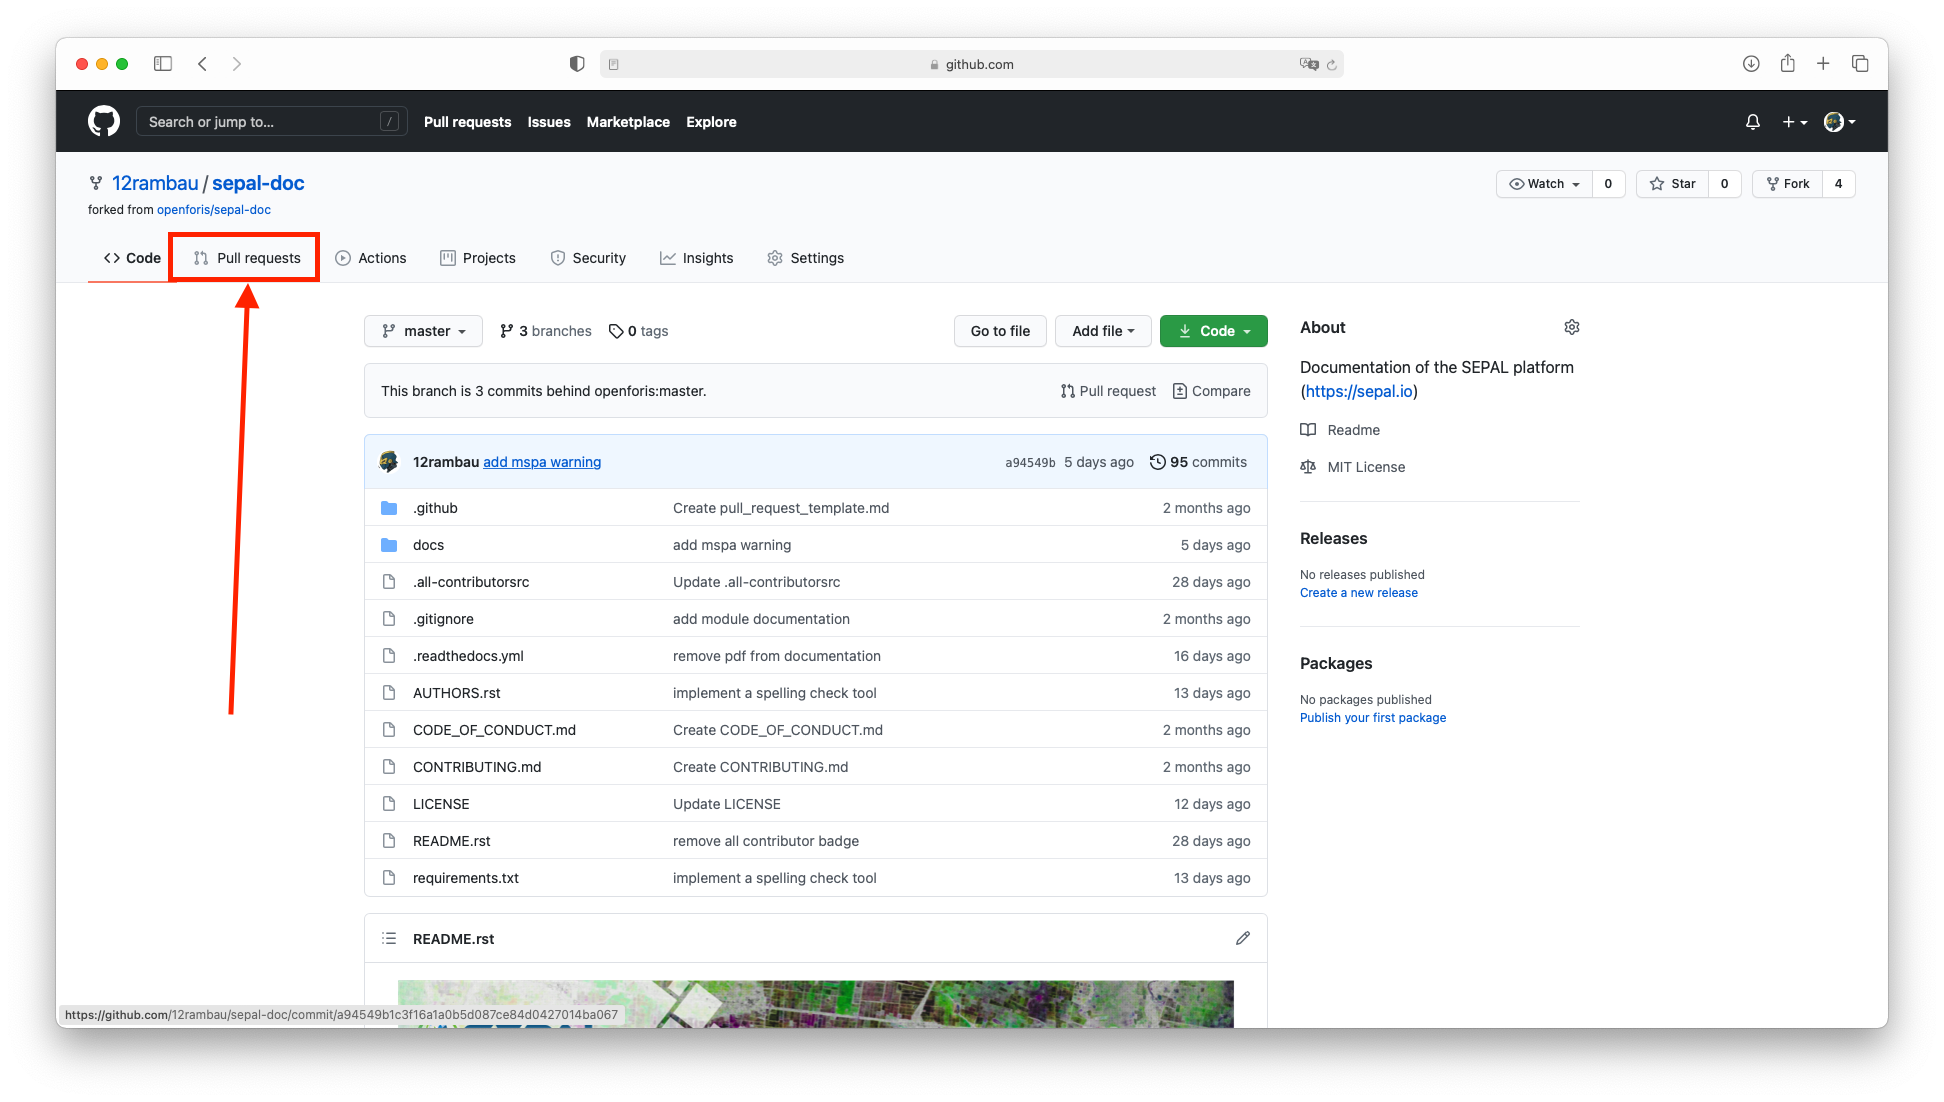
Open the Pull request (PR) interface.#
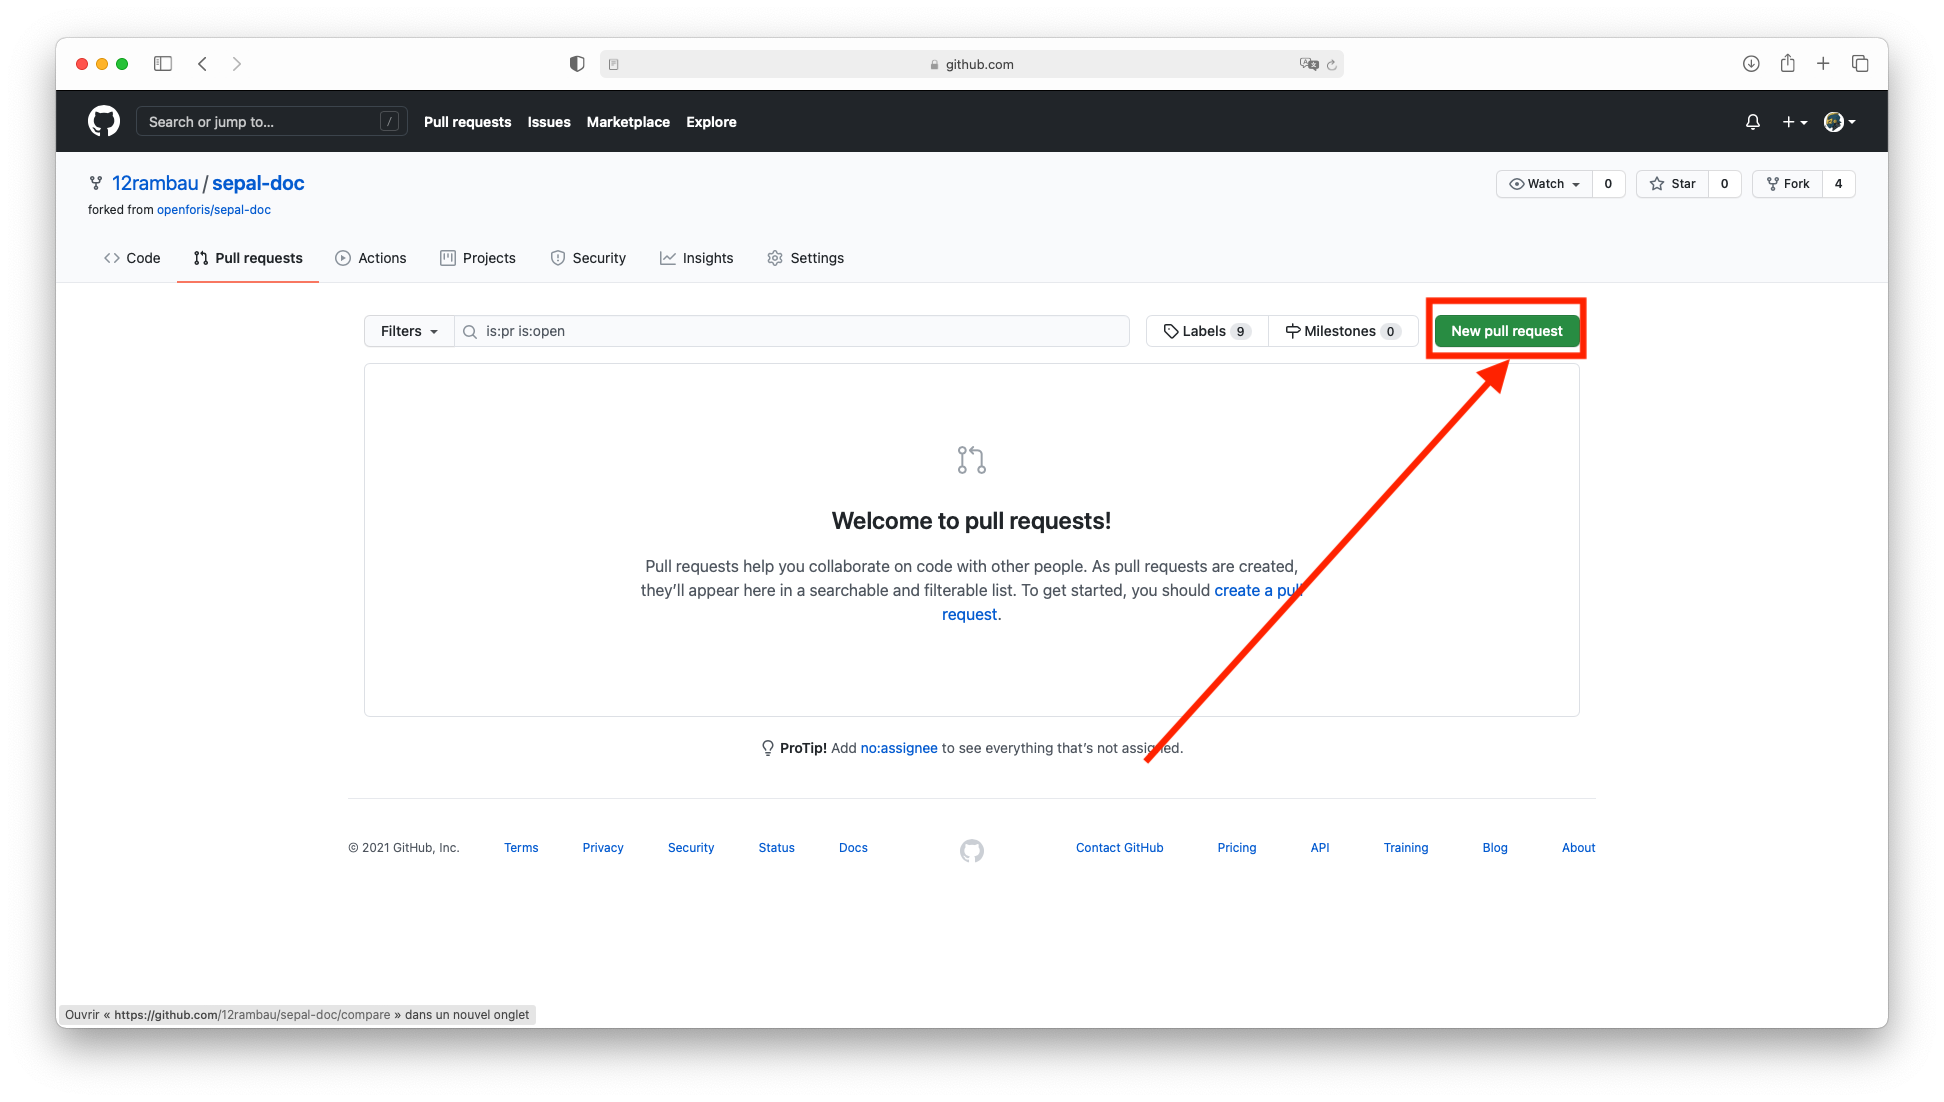
In the Pull request interface, select the New pull request button:
Select what is going to be pushed and where. (If you’ve followed this article correctly, you have not created any branch in your fork.)
On the left side, leave openforis/sepal-doc/master.
On the right side, leave <account>/sepal-doc/master (see 1 in the following image; some extra information on the commit that will be added to the master is displayed in 2).
If everything is set properly (normally you don’t have to change anything), select the Create pull request button.
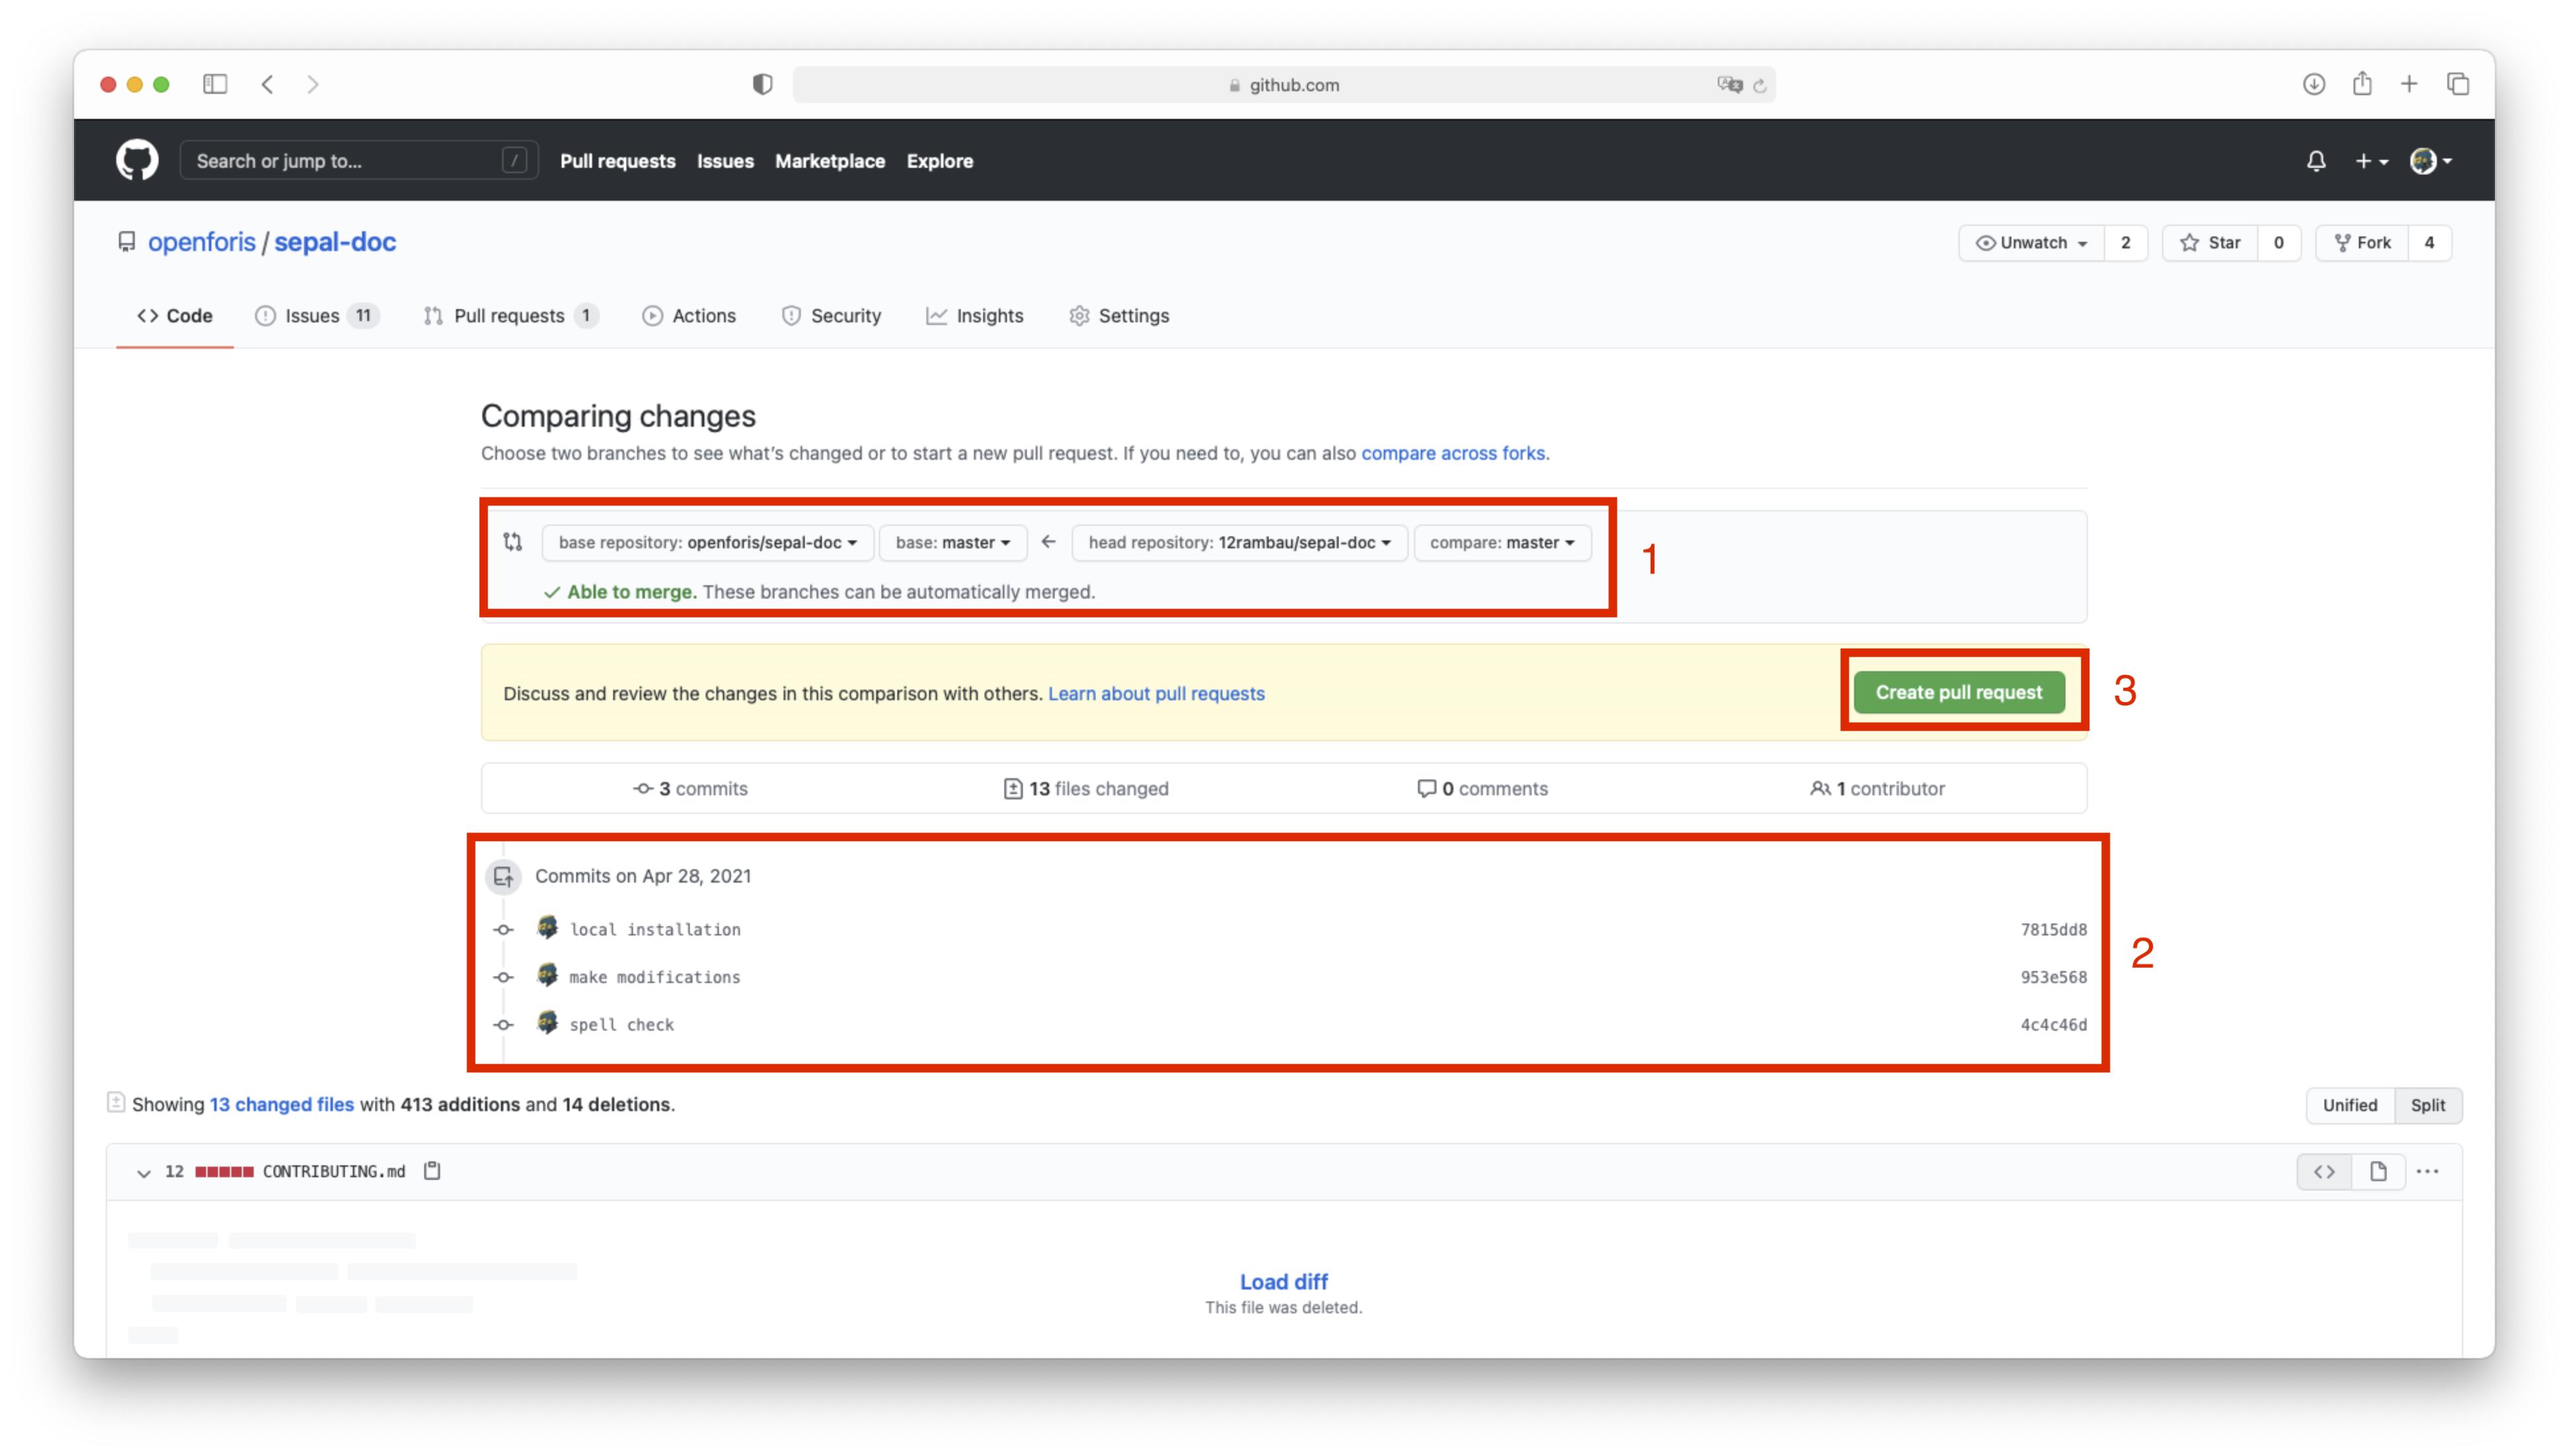
Finally, enter the title and description of the PR (1) (please respect the template provided, as shown in the following image).
As explained at the beginning of this article, you started your modifications to address an issue reported in the GitHub Issue Tracker, which should be referenced in your PR message (in Line 2 using the #<issue number>). This will help the SEPAL team, who will review your PR, by ensuring that they understand what you are adding to the documentation.
Note
You can select the preview button to see what your PR looks like with links.
The Allow edits by maintainers checkbox needs to always be checked (default behavior) (2). This will allow the SEPAL team to make modifications to your PR files (e.g. if you made a mistake in a .rst directive).
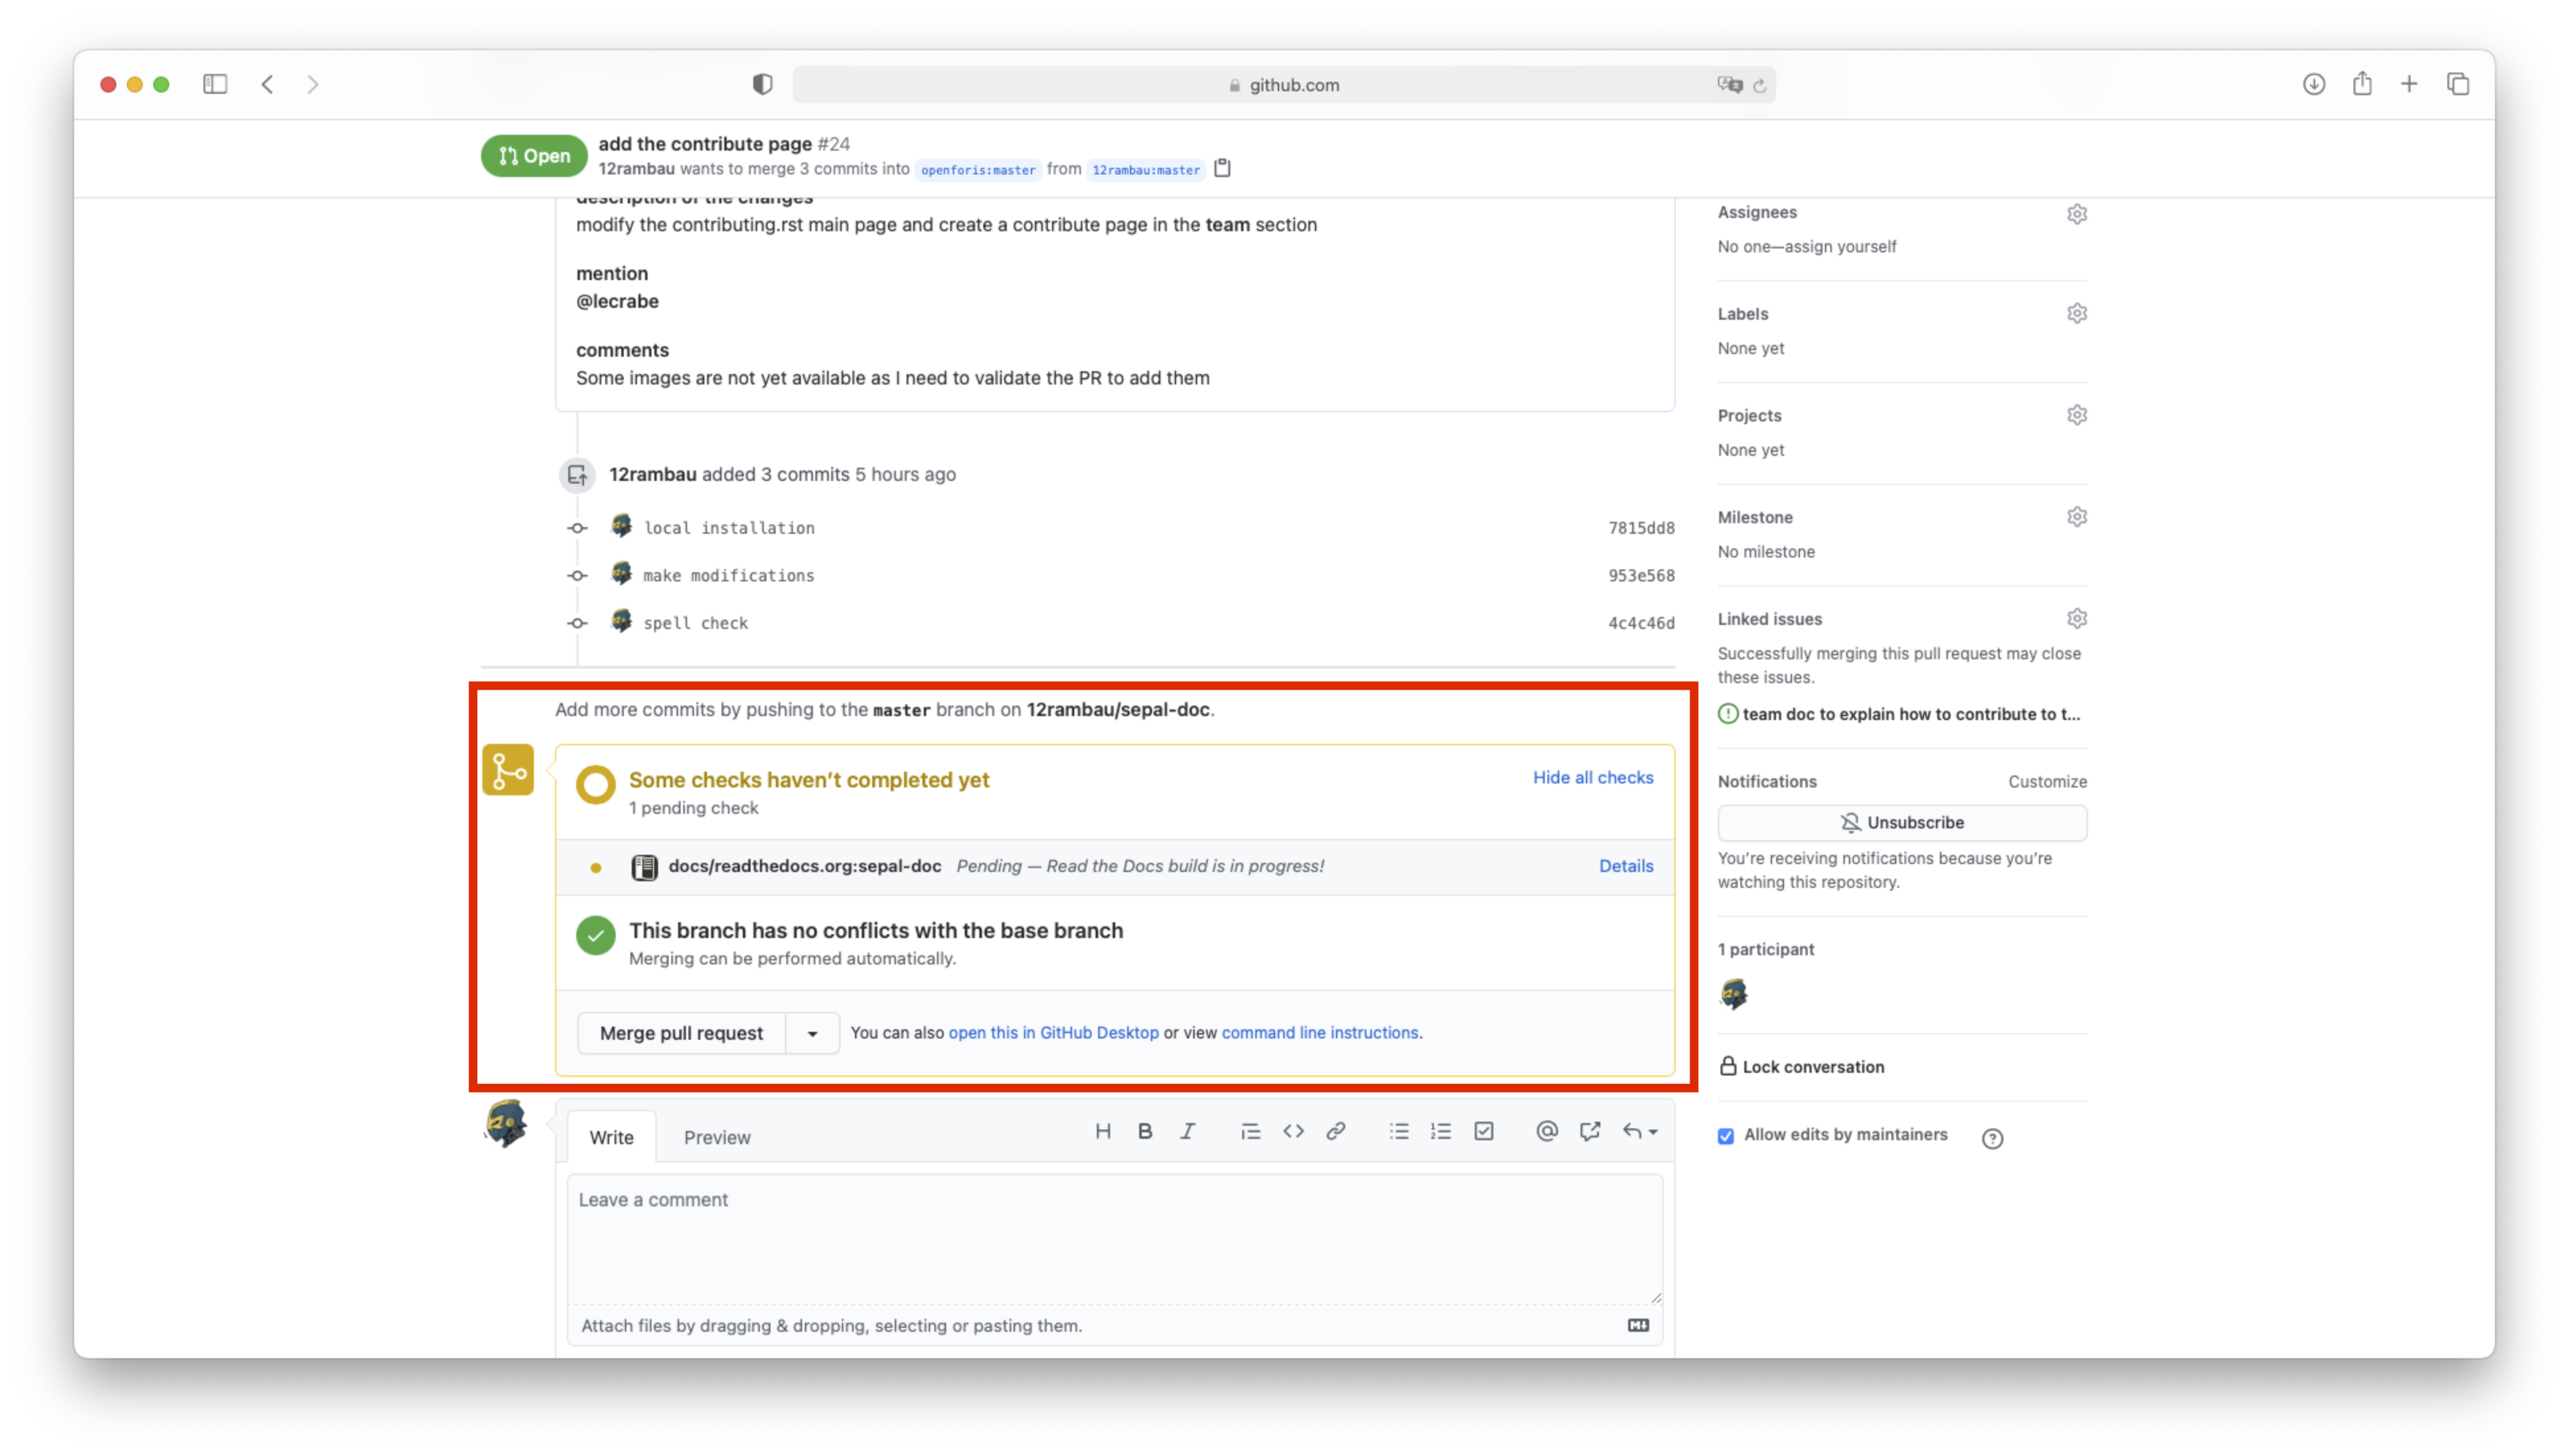
When everything is complete, select Create pull request (3) and validate the creation of the PR.

An automatic check will be performed to see if your PR can be built with ReadTheDoc and distributed in https://docs.sepal.io.
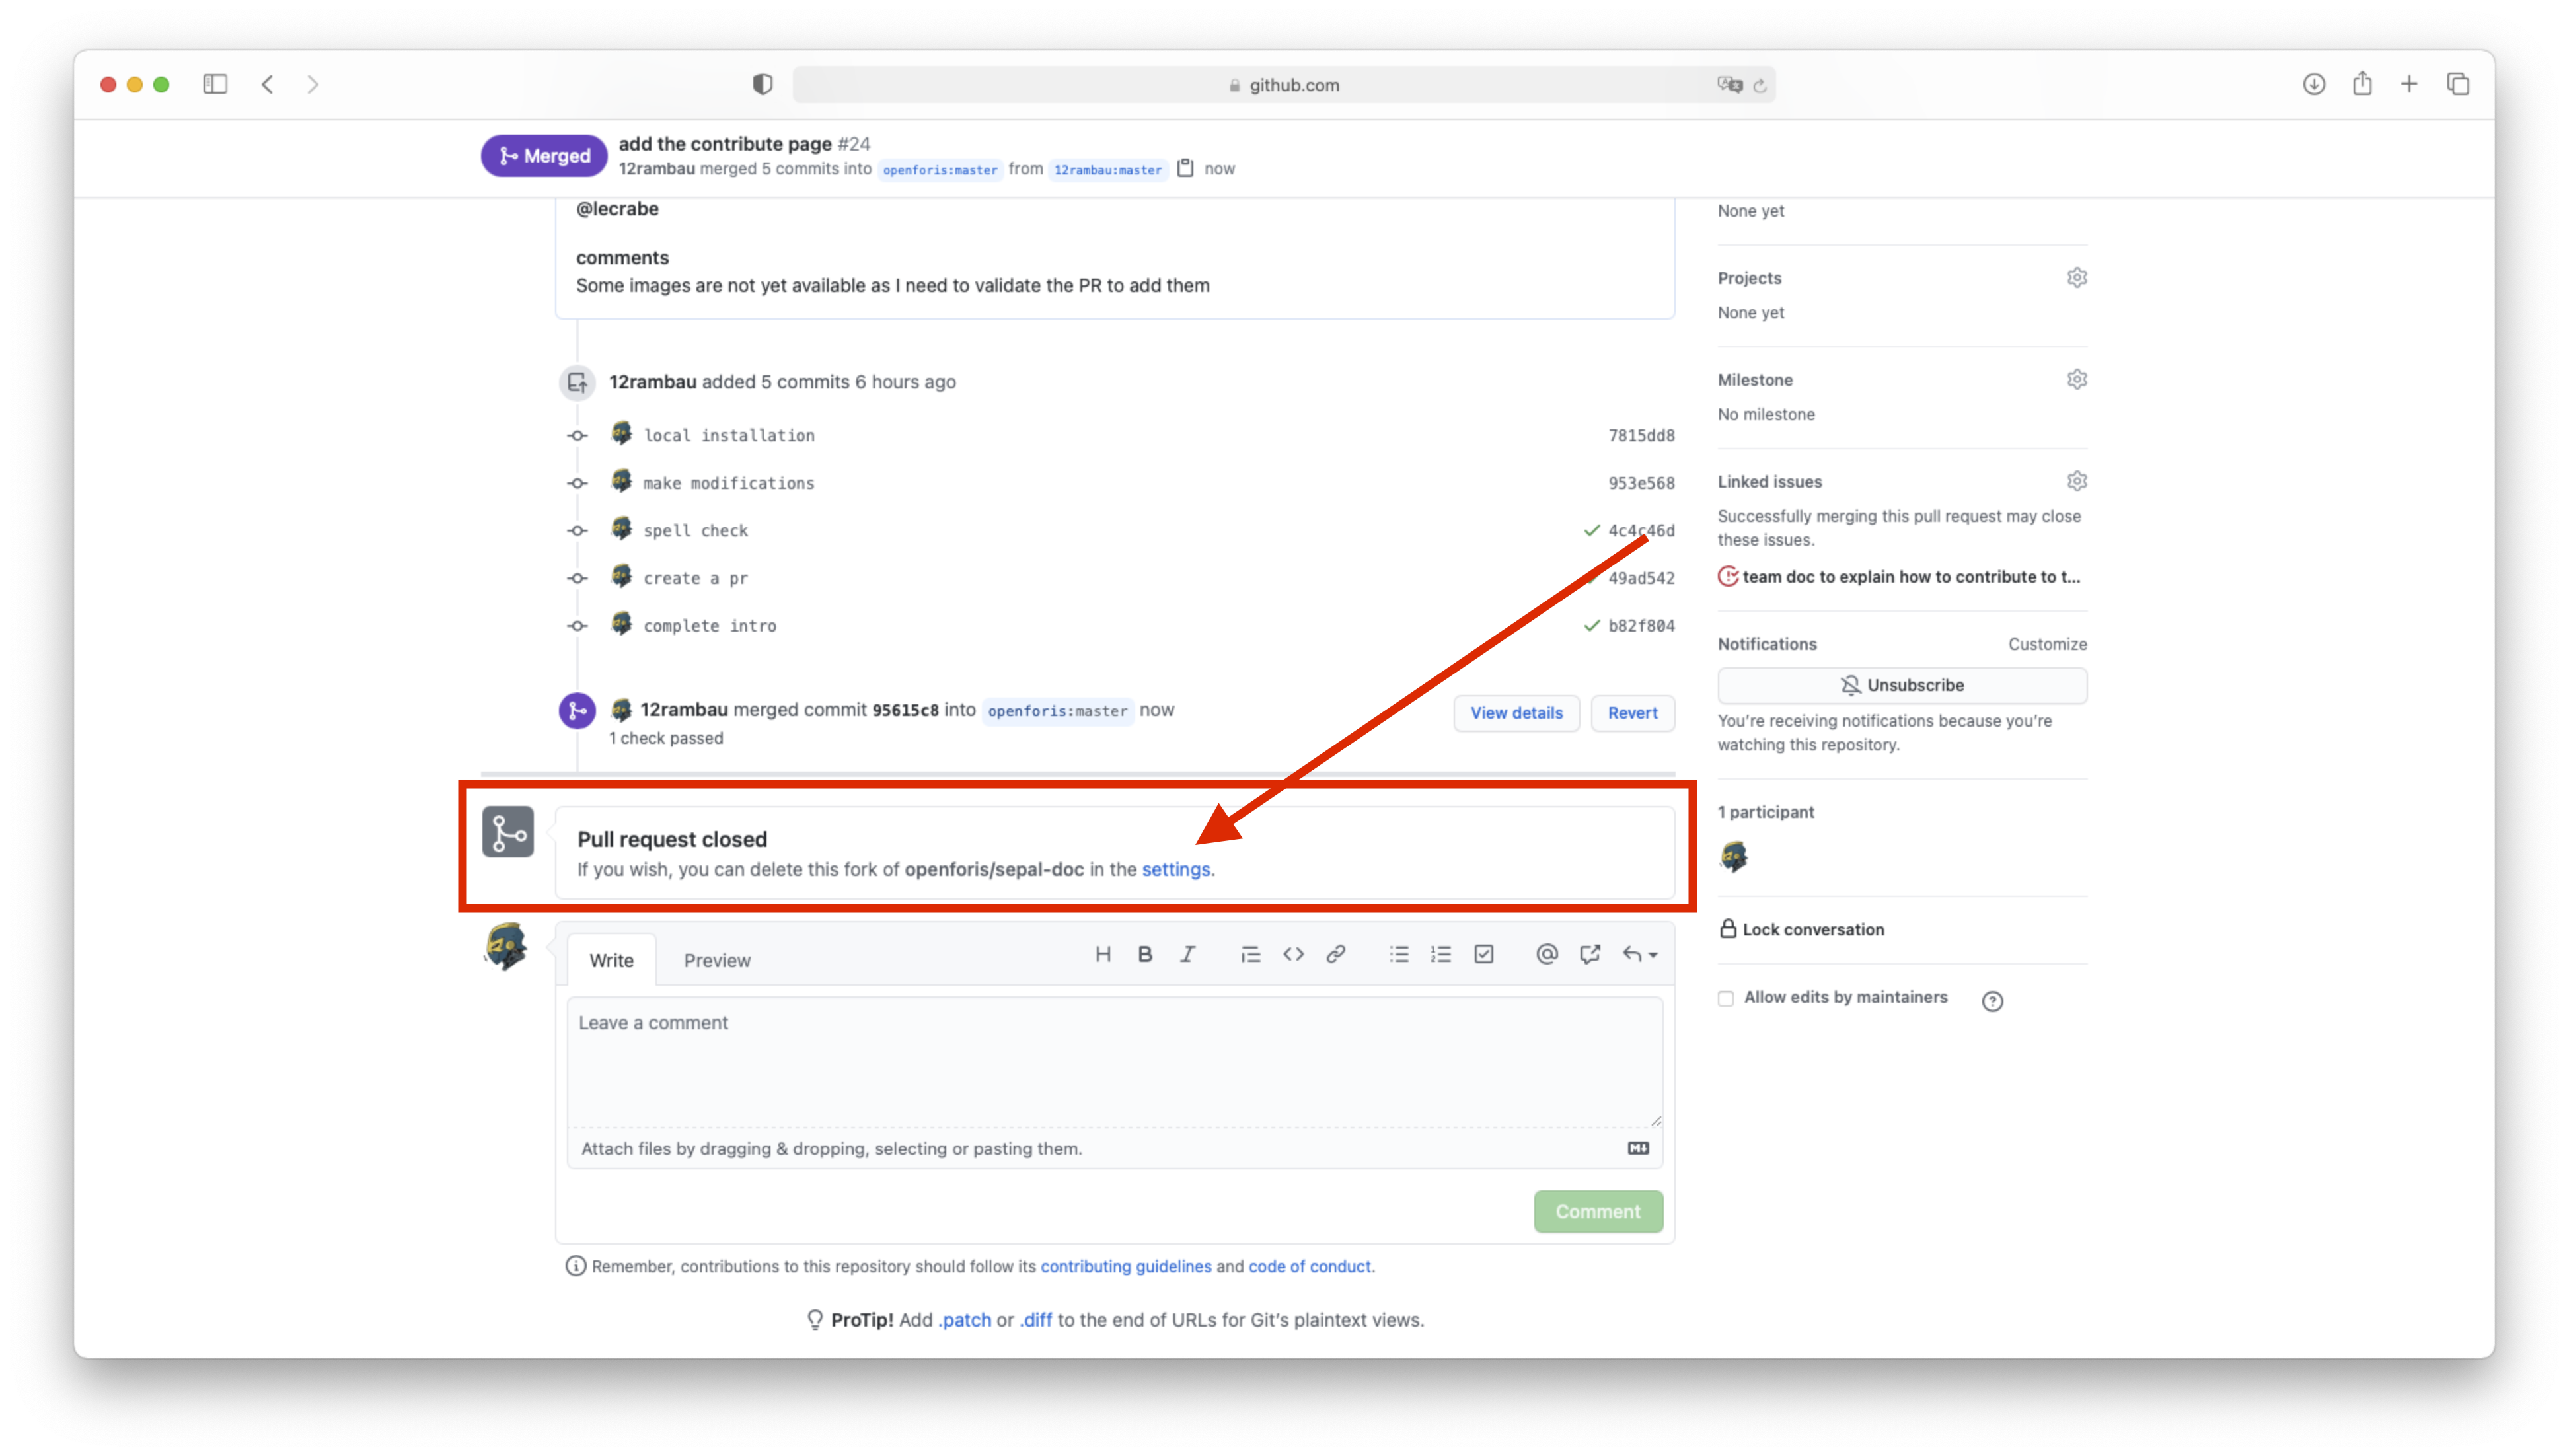
Once submitted, the SEPAL team will review your PR and make the appropriate modifications, if needed. The PR will then be accepted and the new page will be available in the main documentation.
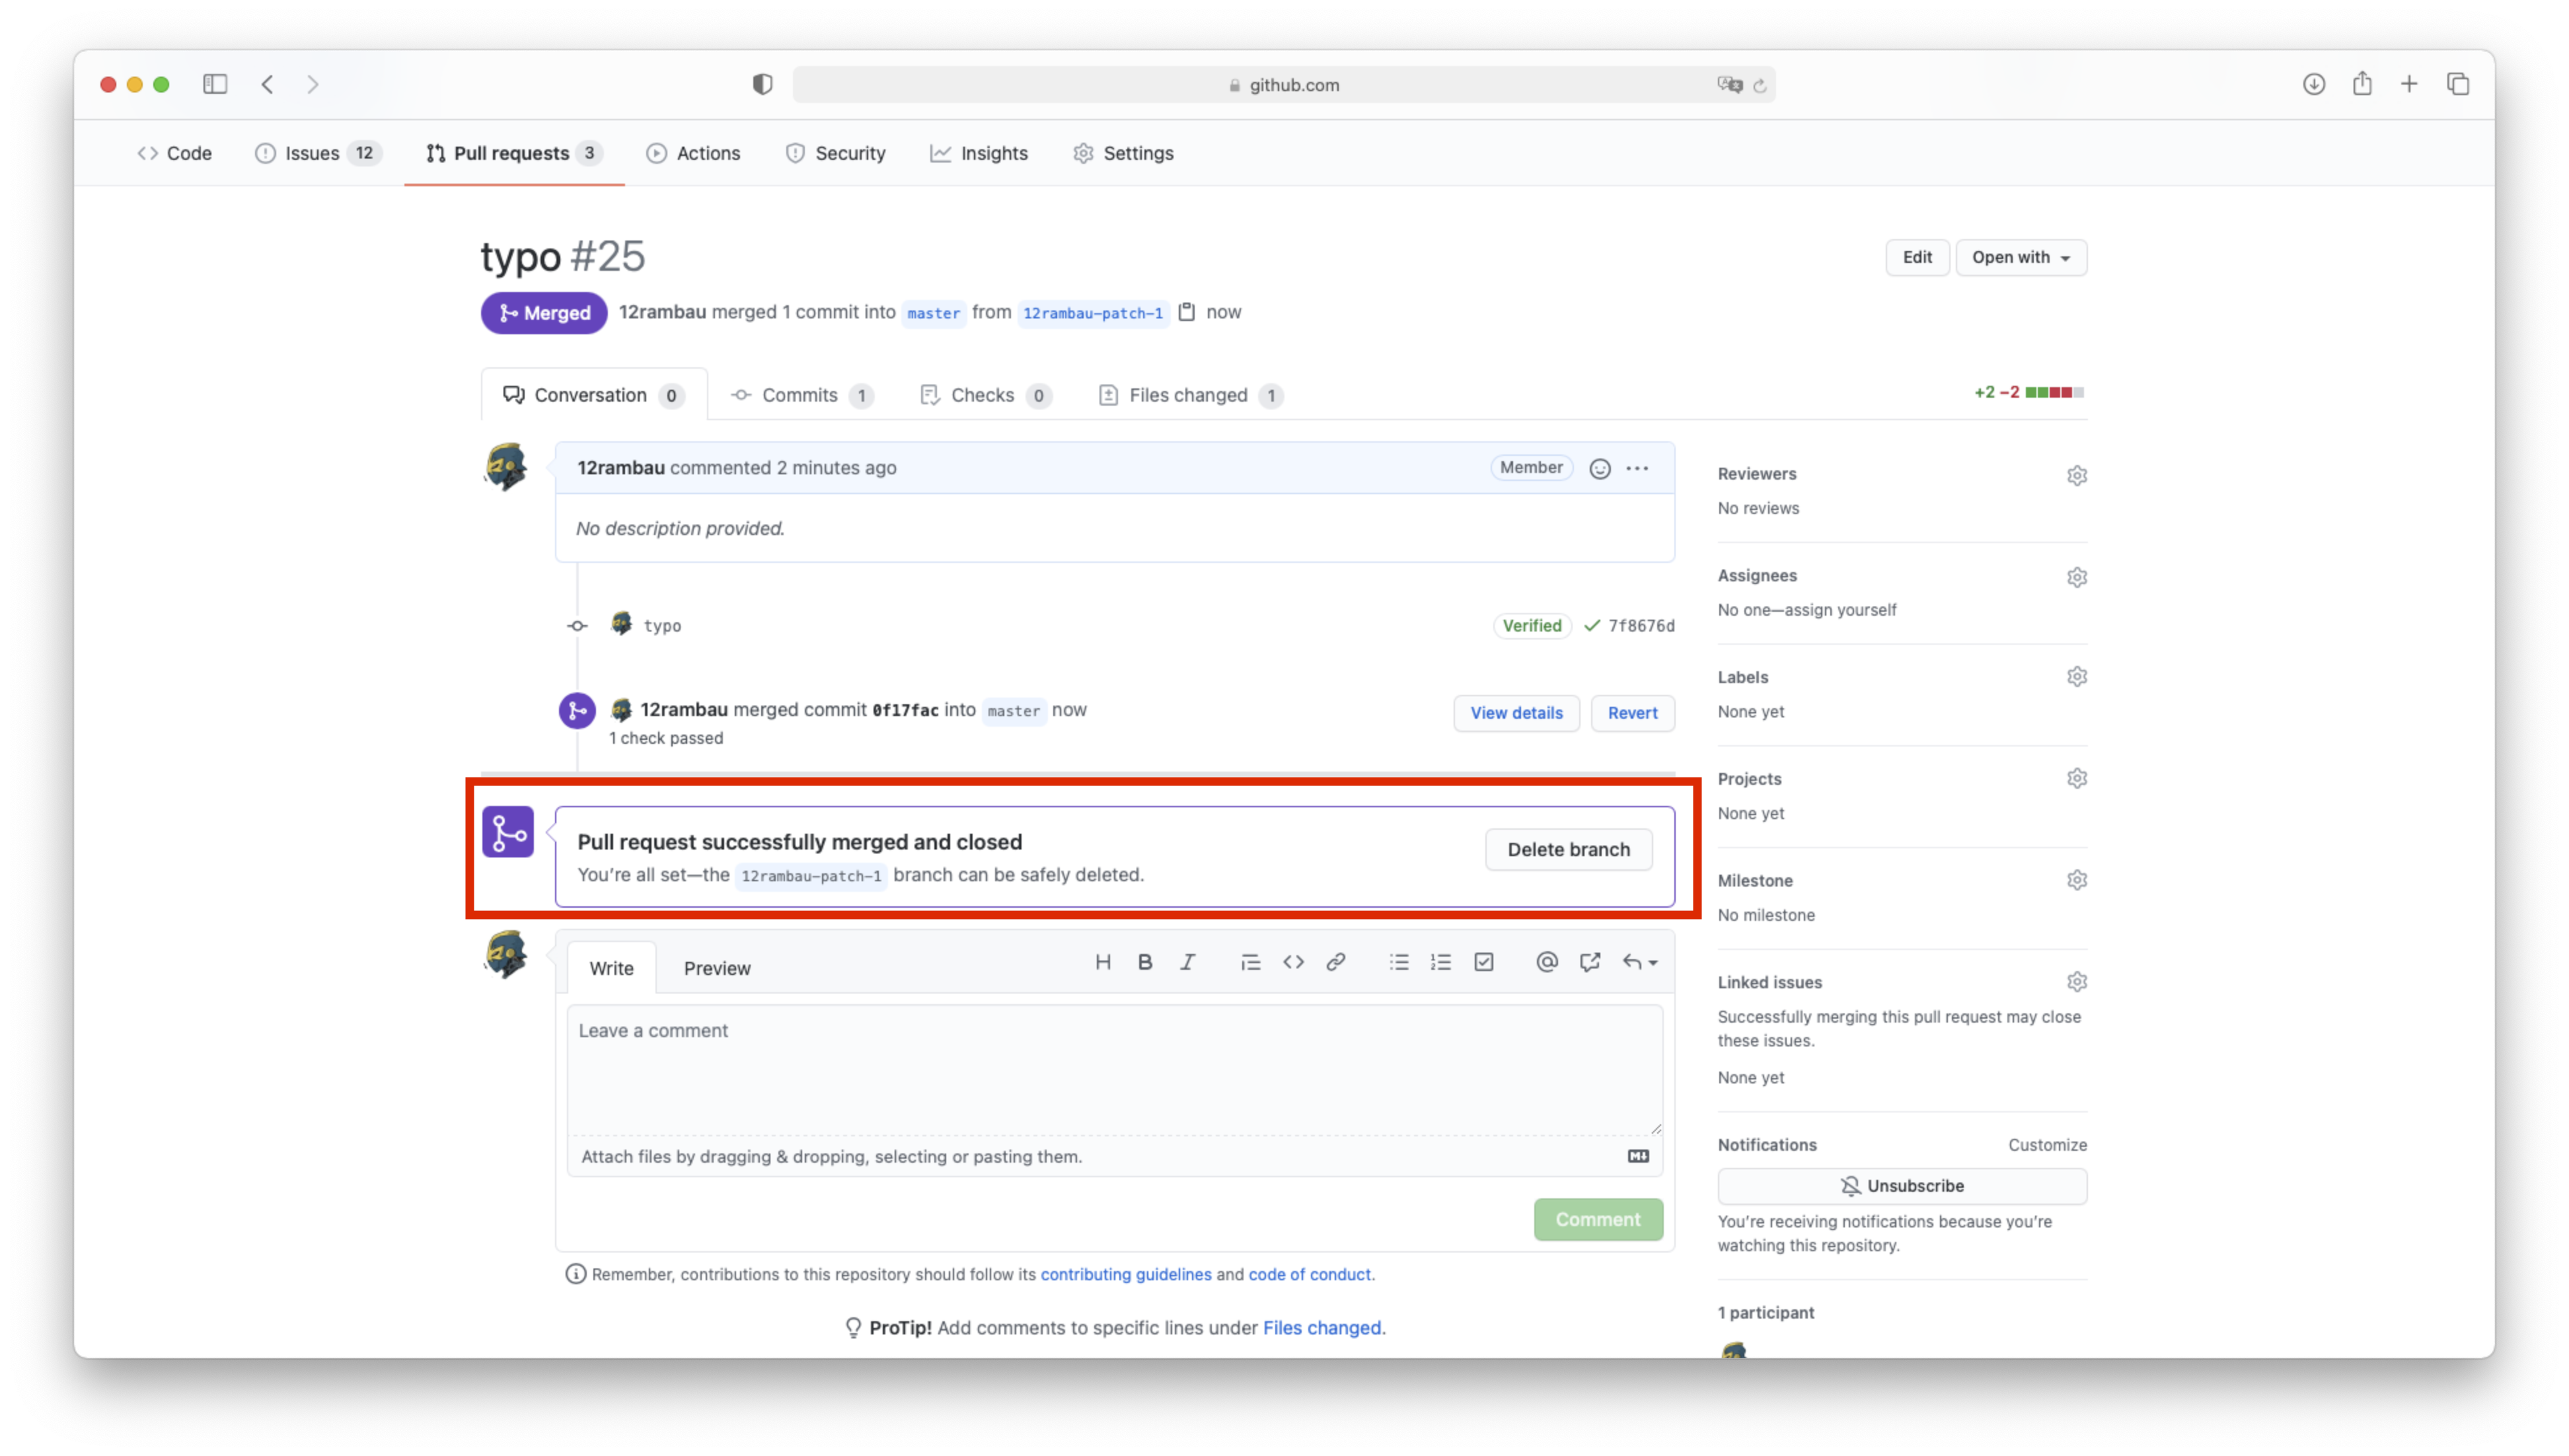
Tip
Once the PR has been validated, please delete your fork in order to avoid merging previous issues when making later modifications.
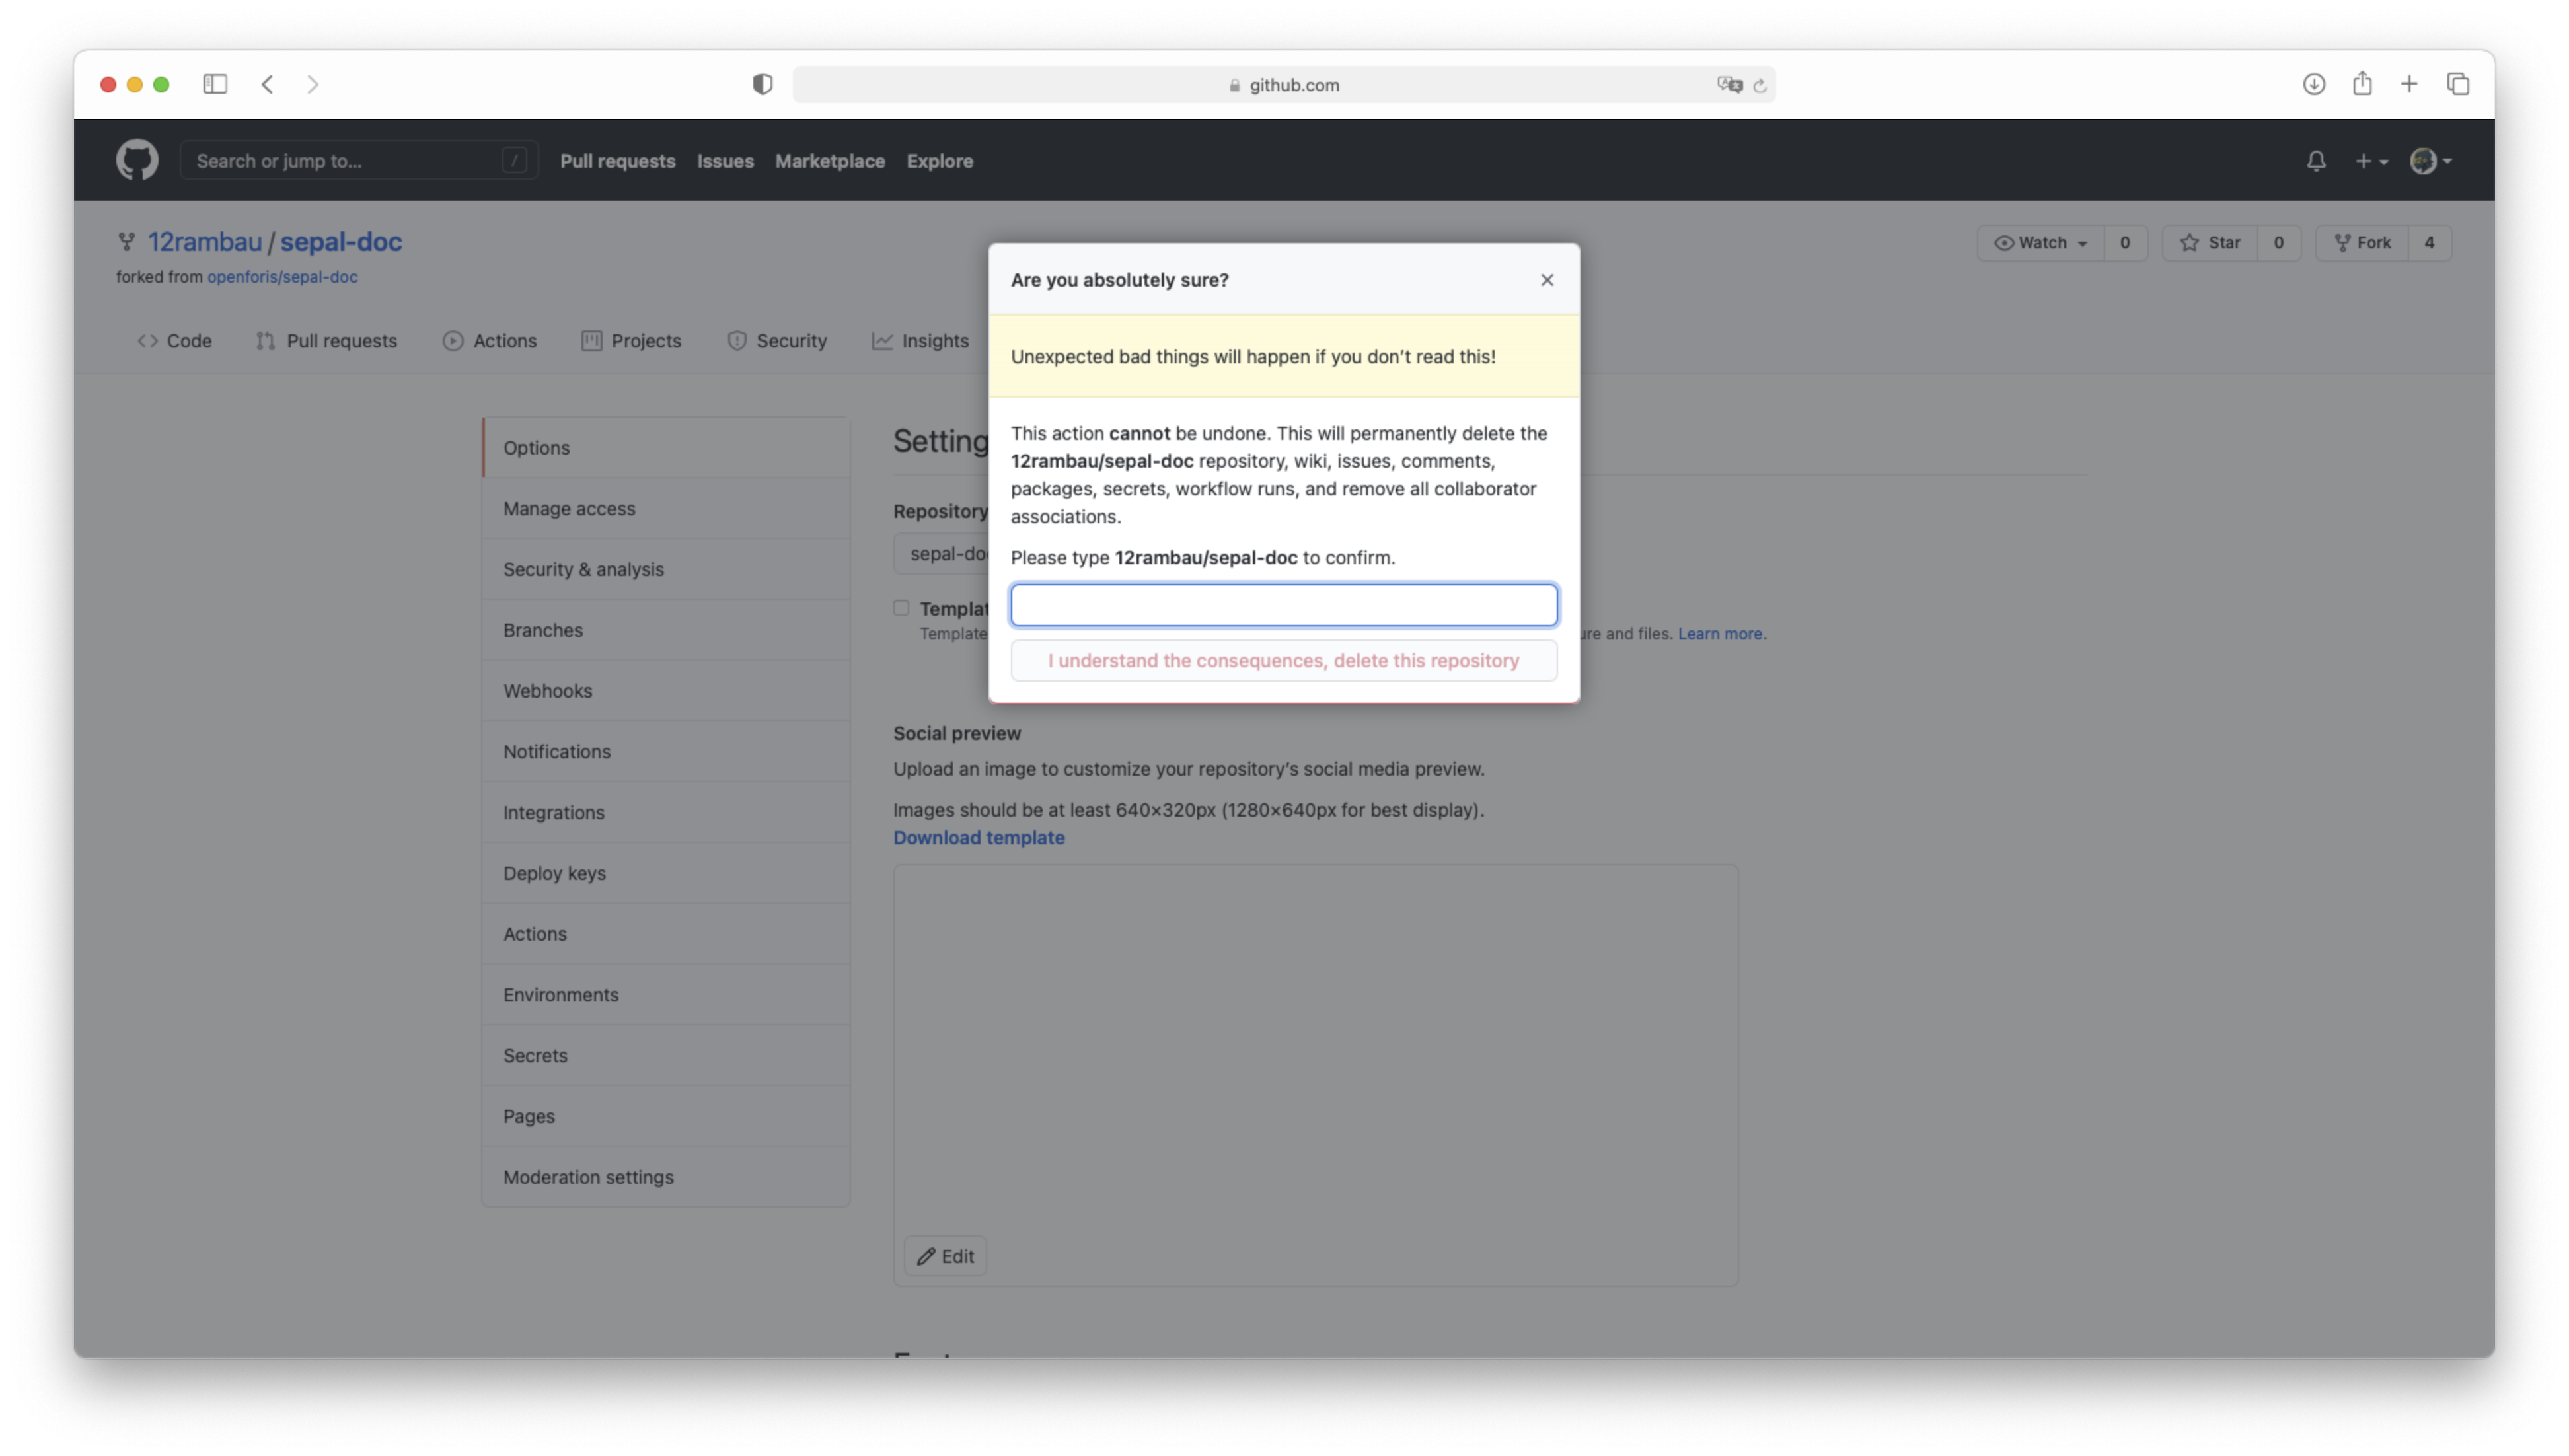
Important
If you are the owner of openforis, do not delete openforis/sepal-doc.